Configuring a form View
2 Tasks
10 mins
Beginner
User Experience
Constellation
English
Scenario
After a request for roadside assistance is approved, the system creates a Service Case. CSRs need the ability to easily review information associated with the Assistance Request Case.
The Confirm request details View is configured with a two-column layout. The configuration of the View overrides Case Step instructions. The Assistance Request Info heading is not displayed.
The following table provides the credentials you need to complete the challenge:
| Role | User name | Password |
|---|---|---|
| Application Development | author@gogoroad | pega123! |
Note: Your practice environment may support the completion of multiple challenges. As a result, the configuration shown in the challenge walkthrough may not match your environment exactly.
Challenge Walkthrough
Detailed Tasks
1 Edit the Confirm request details View
- In the Pega instance for the challenge, enter the following credentials:
- In the User name field, enter author@gogoroad.
- In the Password field, enter pega123!.
- In the navigation pane of App Studio, click Case Types > Service.
- Click the Confirm request details Step to display the contextual properties pane on the right.
- In the contextual properties pane, click Configure View to configure the Confirm request details View.
- In the Layout list, select 2 column to change the display from one column to two columns.
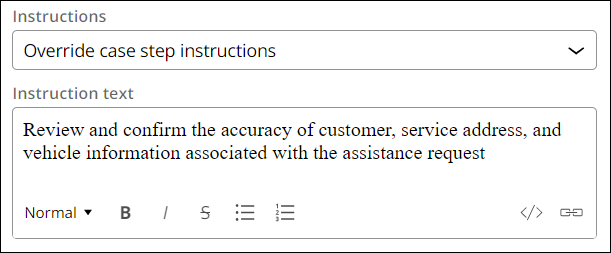
- In the Instructions list, select Override Case Step instructions.
- In the Instruction text field, enter Review and confirm the accuracy of customer, service address, and vehicle information associated with the assistance request to override Case Step instructions.
- To the right of Assistance Request Info, click Configure.
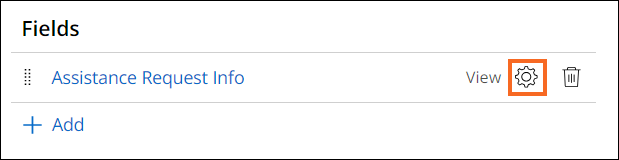
- In the Configure View: Assistance Request Info dialog box, clear the Show heading checkbox.
- Click Save to dismiss the Configure View: Assistance Request Info dialog box.

2 Reorder fields in the Service address View
- Click Assistance Request Info to display the Edit View: Assistance Request Info window.
- Click Service address ( Service address ) to display the Edit View: Assistance Request Info - Service address window.
- In Region A, drag the Street field and drop it in the first position in Region A.
 Note: This is a shared View. Changes that you make to shared Views affect other Views that reuse the shared View.
 - Click Submit to finish configuring the Confirm request details View and Service address View.
- Click Save to save the changes to the Service Case.
This Challenge is to practice what you learned in the following Module:
Available in the following mission:
If you are having problems with your training, please review the Pega Academy Support FAQs.
Want to help us improve this content?