Designating a relevant record
Archived
6 Tasks
30 mins
Intermediate
Dev/Designer Studio
English
Scenario
The Human Resources (HR) department wants to allow HR business partners to update the start date for an employee while the onboarding case is open. If the start date changes, both the employee and the manager receive a confirmation email.
Create a process to allow an HR business partner to update the start date for an employee. Create the process in Dev Studio so that you have more control over which records are made available to developers in App Studio. Configure the process with:
- An assignment shape with the preconfigured flow action AdjustStartDate. The flow action references a preconfigured section that has a read-only field that displays the current start date and an editable field where the HR business partner can set a new start date.
- A step to send an email to the employee. Create an email correspondence that contains the following text:
As discussed in our telephone conversation, your start date has changed from <<.Employee.StartDate>> to <<.NewStartDate>>. - A data transform to set the value of the employee start date using the value of the new start date, then to delete the new start date from the clipboard.
Add the process to the Relevant Records list to make the process available in App Studio. In App Studio, add the process to the Equipment selection stage as an optional action for the Onboarding case type.
The following table provides the credentials you need to complete the challenge.
| Role | User name | Password |
|---|---|---|
| Senior System Architect | SSA@TGB | rules |
Note: Your practice environment may support the completion of multiple challenges. As a result, the configuration shown in the challenge walkthrough may not match your environment exactly.
Challenge Walkthrough
Detailed Tasks
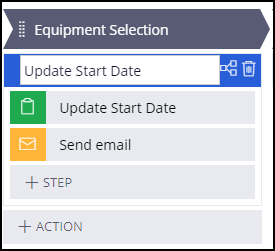
1 Create a process flow
- In Dev Studio, click Create > Process > Flow.
- In the Create Flow window, in the Label field, enter Update Start Date.
- Set the context to the Onboarding case with the highest available ruleset.
- Click Create and open to create the Update Start Date process flow.
2 Configure an assignment shape to edit the start date
Note: The flow rule includes an assignment shape labeled Update Start Date by default.
- Right-click the connector between the assignment shape and the end shape.
- Click View Properties to open the connector properties.
- In the Connector section, in the Flow action field, enter or select AdjustStartDate.
- Click Submit.
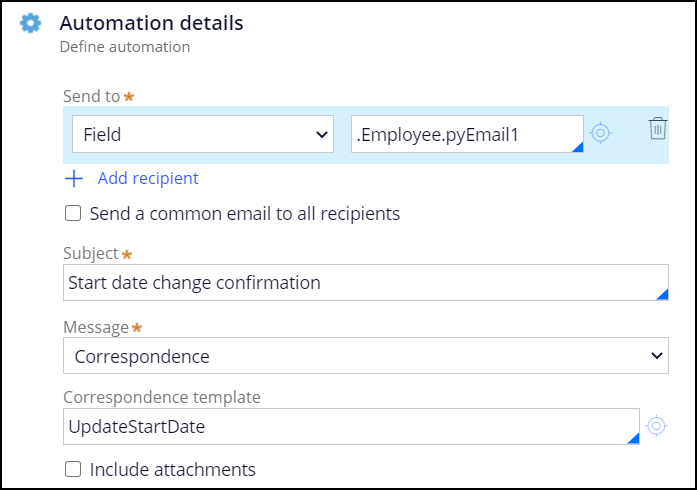
3 Configure a Send Email step to notify the employee of the start date change
- In the flow rule, click the plus then Automations > Send email to add a Send email shape.
- Double-click the shape to begin configuration.
- In the Automation details section, configure the shape to send the email to the .Employee.pyEmail1 field.
- Enter the email subject as Start date change confirmation.
- From the Message drop-down list, click Correspondence to compose an email correspondence.
- In the Correspondence template field, enter UpdateStartDate, then click the crosshairs icon to create a correspondence rule.
- On the Create Correspondence form, in the Correspondence Type field, enter or select Email, then click Create and open to create the rule.
- In the text field, enter the email body as specified in the Scenario section. Insert properties for the employee start date and new start date.
- Click Save to finish composing the email content.
- Return to the Update Start Date flow rule.
- Click Submit to complete the Send Email step configuration.
- Adjust the connectors so that the connector from Update Start Date leads to Send email.
- Add a connector from Send email shape to the end shape.

4 Configure a data transform to set the new start date
- Click Create > Data Model > Data Transform to create a new data transform.
- In the Label field, enter the name of the data transform as Adjust Start Date to New Date.
- Set the context to the Onboarding case with the highest available ruleset.
- Click Create and open to create the data transform.
- In the Definition tab, in the first step of the data transform, set the .Employee.StartDate equal to .NewStartDate.
- Add a second step to the data transform to remove .NewStartDate from the clipboard.

- Click Save to save the data transform.
- Return to the Update Start Date flow rule.
- Double-click the connector between the Send email step and the end shape.
- In the Set properties section, select the Apply data transform radio button.
- Select the data transform AdjustStartDateToNewDate.
- Click the Submit to complete the configuration on the connector.
5 Designate the process as a relevant record
- From the flow rule, click the Actions menu and select Mark as relevant record.

- Click Save to save the flow rule.
6 Add the process to the Onboarding case type
- Switch to App Studio.
- In the Onboarding case life cycle, click Optional actions.
- Below Equipment selection stage, click + Action > More > Processes to locate the Update Start Date process.

- Click Update Start Date > Select.
- Click Save to finish adding the Update Start Date process to the Onboarding case type.