Localizing a UI form
Archived
4 Tasks
45 mins
Beginner
English
Scenario
ABB has a requirement to translate the ReserveIt application to Spanish.
Use the Localization wizard to localize the Booking case type of the ReserveIt application, export the files, translate properties on a UI form into Spanish, import the files, set the locale settings, and test the translated form.
The following table provides the credentials you need to complete the challenge.
| Role | User name | Password |
|---|---|---|
| System Architect | admin@reserveit | rules |
Note: Your practice environment may support the completion of multiple challenges. As a result, the configuration shown in the challenge walkthrough may not match your environment exactly.
Challenge Walkthrough
Detailed Tasks
1 Run the Localization wizard
- In the header of Dev Studio, click Configure > User Interface > Application readiness > Localization> Translate to new language to start the translation process.
- In the select a Language drop-down list, select Spanish ES, and click Add.
- Click Next to proceed to the next step.
- Click Next.
Note: If a No unlocked rulesets available message displays, close the message window and deselect and select the ReserveIt ruleset
- Click Enable records for translation to set the localize flag on each record.
Note: Translation script completion may take a few minutes.
- Click Next.
- Click Download for translation to create the translation pack.
Note: This may take several minutes. The translation pack automatically downloads to your default Downloads folder.
- Click Next.
-
Save the Work ID of the translation in progress into a text for further reference and click Close to close the Localization wizard.
Note: If the application is translated into multiple languages or if the wizard is executed more than once, you will need the Work ID because there will be more than one Work ID to choose from when you import the translation pack.
2 Edit the TextToTranslate.xml file
- Extract the contents of the translation package to your local drive. The translation package decompresses to a folder named Translation_<LanguageSelectedForTranslation>_<DateArchiveCreated>_<TimeStamp> (for example,Translation_Spanish_2020-12-08_15-37-29).
- In the TranslationFiles folder, open the TextToTranslate.xml file.
Note: Using Microsoft Excel 2003 or later, you can edit this file by clicking the Enable Editing button when the spreadsheet first opens.
- Enter the Spanish text in column B (Translation) for the labels listed in the following table.
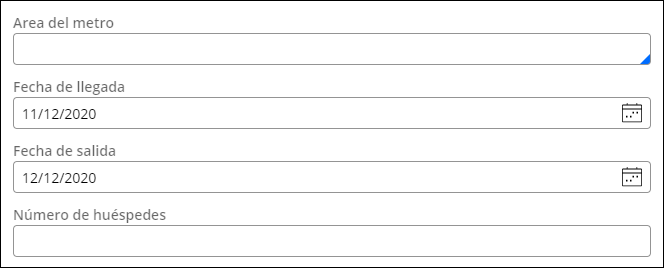
English terms Spanish term Metro area Area del metro Arrival date Fecha de llegada Departure date Fecha de salida Number of guests Número de huéspedes - Save the TextToTranslate.xml file to commit your translations.
Note: Do not change the name of the TextToTranslate.xml file. The translation wizard looks for this exact name during the import process.
- After the desired translations are complete, repackage the parent folder as a .zip archive.
3 Import the translation pack
- In the header of Dev Studio, click Configure > User Interface > Application readiness > Localization> Translations in progress to upload your file.
- Select the appropriate translation Work ID that you noted when running the Translation wizard.
- Select the ReserveIt (Spanish):01-01-01 ruleset as the location to which you want to save the translations.
Note: If you pick a non-localized ruleset, the wizard creates a new localized ruleset and version. If the ruleset already exists, the wizard imports translations to the existing localized ruleset.
- For the HTML paragraphs, correspondences, and Correspondence Fragments, enter 01-01-01 as the ruleset version.
- Click Next.
- Click Choose File and select the updated translation package you created in the previous steps.
- Click Next to import the translation pack.
Note: It may take several minutes to import the translation file.
- Click Finish and then click Close to close the Localization wizard.
4 Confirm your work
- In the header of Dev Studio, click Configure > User Interface > Application readiness > Localization > Locale Settings.
- From the Use Locale drop-down list, select Spanish (Spain) and click Update.
- Return to the ReserveIt application and create a Booking case. When the UI form is displayed, verify the field values are translated as shown in the following image.
- Change the Locale Settings back to Ingles (Estados Unidos) and click Update.
- Create a new Booking case and verify the field values are in English.