
Externe Datenquelle zu einem Datentyp hinzufügen
7 Aufgaben
30 Min.
Mittel
Datenintegration
Deutsch
Szenario
Bei Pannenhilfeanfragen muss der Fahrzeugtyp benannt werden, damit sich der Service-Provider auf den Serviceabruf vorbereiten kann. Für bestimmte Fahrzeuge ist unter Umständen ein Tieflader-Abschleppwagen oder eine Kraftstoffmischung mit höherer Oktanzahl erforderlich. Damit sich Service-Provider besser auf einen Serviceabruf vorbereiten können, wollen die Beteiligten sicherstellen, dass die Nutzer für ein Fahrzeug nur eine gültige Kombination aus Marke, Modell und Baujahr eingeben. Nach Auswertung mehrerer möglicher Quellen für Fahrzeugmodelle beschlossen die Beteiligten daher, diese Informationen von einem Webdienst der US National Highway Traffic Safety Administration (NHTSA) zu beziehen, der hier verfügbar ist. https://vpic.nhtsa.dot.gov/api.
Ersetzen Sie die aktuelle simulierte Datenquelle durch eine Integration, um die Modellinformationen für Personenkraftwagen und Lkws von einem von der NHTSA angebotenen Representational State Transfer (REST)-Dienst zu beziehen. Befüllen Sie die Datenseite D_VehiclemodelsList mit NHTSA-Antwortdaten aus, die auf vom Benutzer eingegebenen Modelljahren und Marken beruhen.
Hinweis: Die NHTSA-Daten enthalten Informationen über andere Fahrzeugtypen, wie z. B. Busse, die der GoGoRoad-Pannenhilfsdienst nicht unterstützt. Um nur relevante Fahrzeugmodelle anzuzeigen, konfigurieren Sie die Integration so, dass sie zwei Aufrufe an den NHTSA-Dienst unterstützt: einen für Pkw und einen für Lkw.
In der folgenden Tabelle finden Sie die Anmeldedaten, die Sie zur Durchführung der Challenge benötigen.
| Rolle | Benutzer ID | Kennwort |
|---|---|---|
| Application Developer | author@gogoroad | pega123! |
Challenge-Schritte
Genaue Übungsschritte
1 Create a data object with an external data source
Create a new data object to query the NHTSA REST service for vehicle model information.
- In App Studio, from the left navigation pane, click Data > Data objects and integrations to open the Data objects and integrations landing page.
- In the upper-right corner of the landing page, click New to open the Data Object wizard and create a data object to access the NHTSA service.
- In the Data Object wizard, in the Data objects name field, enter NHTSA Model data.
- In the System drop-down, select Create new. The wizard updates to display additional fields to define the new data source.
- In the Name field, enter NHTSA vPIC.
- In the Description field, enter NHTSA Product Information Catalog Vehicle Listing.

- In the Endpoint URL field, enter https://vpic.nhtsa.dot.gov/api/vehicles/GetModelsForMakeYear/make/Ford/modelyear/2015/vehicletype/Truck?format=json to specify the URL for the NHTSA web service. The Parameters section expands to display the URL parts for the service URL.
- Using the following table, add parameters for the make, model year, and vehicle type parts of the service URL.
URL part Parameter name Ford make 2015 modelyear Truck vehicletype 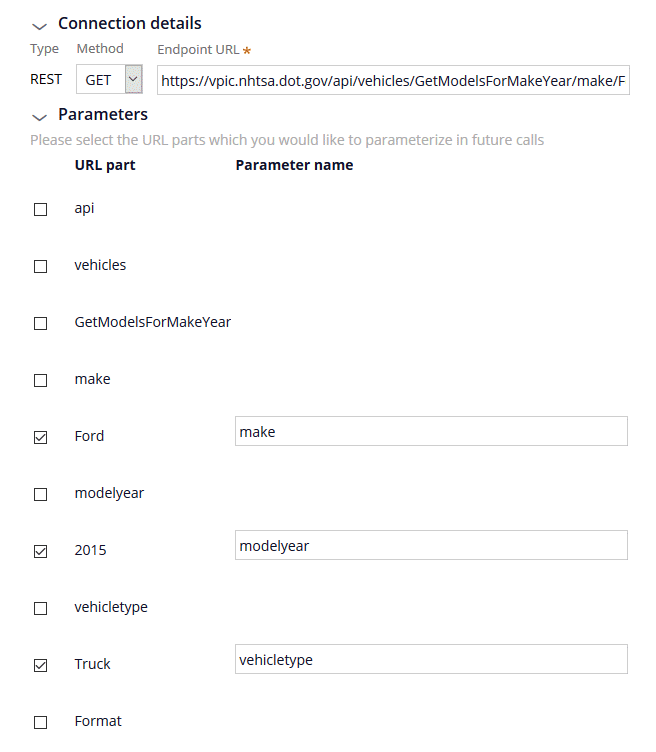
- Click Initialize call to call the REST service and advance to the second step of the wizard.
2 Map the response from the data source
View a sample of the response data from the NHTSA REST service and map the response to the data model for the data object.
Hinweis: The response indicates seven results were returned and displays data for one of the seven results. The number of results returned varies according to the parameters passed to the service.
- In the SearchCriteria row, click Add new to map the SearchCriteria field from the REST response to a field for the data object. The contents of the row update to display the Map to field and a drop-down listing field types.
- In the SearchCriteria row, click the Add/Edit map to icon to accept the default mapping and create a text field named SearchCriteria in the data object.

- Repeat steps 1 and 2 for the Results array and the Make_Name, Model_Name, and VehicleTypeName response fields.

- Click Next to complete the data mapping and advance to the third step of the wizard.
3 Define the endpoint settings for the integration
Enter the integration settings to finish configuring the integration to the NHTSA REST service.
Hinweis: The NHTSA does not require user authentication to access the service and receive response data. Other data providers may require authentication. Verify any authentication requirements when you configure an integration to a web service.
- Under Endpoint URL, in the Name field, enter GetVehicleModels_BaseURL to identify the connection settings.
- Under Stage, in the Base URL field, enter https://vpic.nhtsa.dot.gov to complete the URL used after migrating the application to a staging system.
- Under Prod, in the Base URL field, enter https://vpic.nhtsa.dot.gov to complete the URL used after migrating the application to a production system.
- Under Authentication, in the Name field, enter AuthProfile_NHTSA_vPIC.
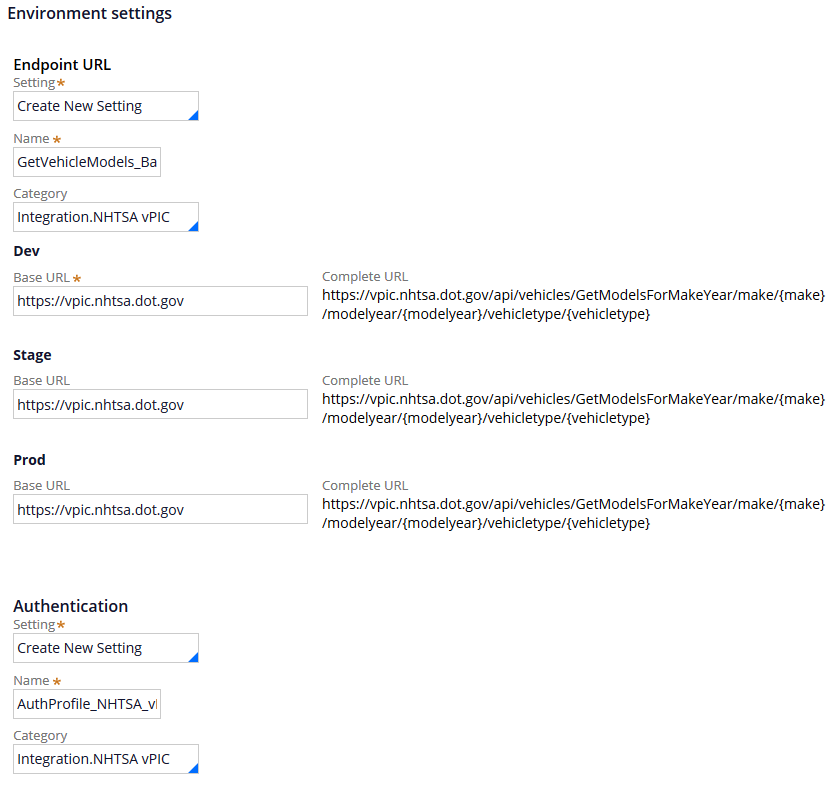
- Click Submit to complete the configuration of the data object and REST integration.
4 Aggregate the responses from the data source
Configure the current simulated data source to call the NHTSA REST service twice to obtain a listing of vehicle models for both passenger cars and trucks.
- In Dev Studio, from the left navigation pane, click Data types to list the data objects defined for the GoGoRoad application.
- Expand the Vehicle model entry to list the data views configured for the data object.
- Click List vehicle models to open the D_VehiclemodelsList data page, which caches a listing of vehicle models.
- Clear the Simulate data source check box to remove the simulated data source from the data page.
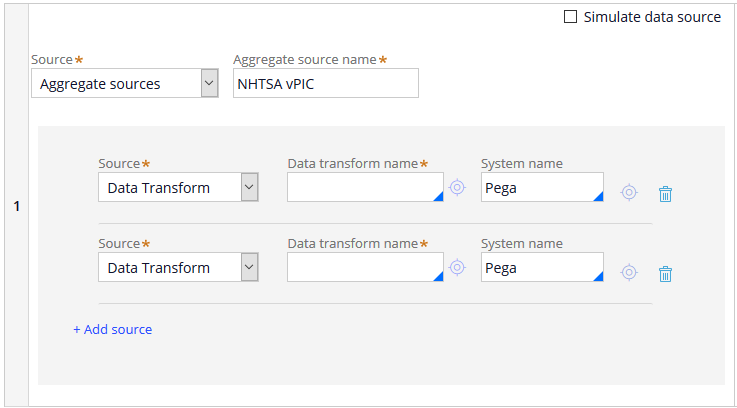
- In the Source drop-down, select Aggregate sources to source the data page using two REST calls.
- In the Aggregate source name field, enter NHTSA vPIC to identify the data source for the data page.
- In the Source drop-down, select Data transform.
- Click Add source to add a second source for the data page.
- In the second Source drop-down, select Data transform.
5 Configure the source data transform
Configure a data transform to populate the data page with results from the NHTSA service.
- For the first source, in the Data transform field, enter MapModels.
- Click the open icon to create the data transform.
- Click Create and open to accept the default settings and open the data transform rule form.
- Define parameters for the data required by the NHTSA service.
- Click the Parameters tab to define three parameters needed by the NHTSA service.
- On the Parameters tab, click the add icon to add a row to define a parameter.
- In the empty parameter row, in the Name field, enter make.
- In the Required drop-down, select Yes.
- Repeat steps b-d to add two more parameters to the data transform, using the information in the following table.
Name Required modelyear Yes vehicletype Yes
- Add information to resolve references to pages accessed by the data transform.
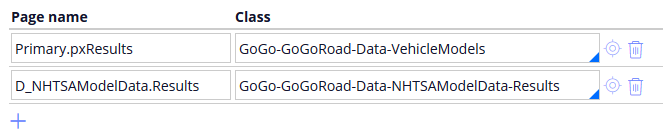
- Click the Pages & Classes tab to identify the pages used by the data transform and the class of each page.
- On the Pages & Classes tab, in the Page name field, enter Primary.pxResults to identify the page that contains the output of the data transform.
- In the Class field, enter or select GoGo-GoGoRoad-Data-VehicleModels to identify the class of the output page.
- Click the Add item icon to add a second row to the Pages & Classes tab.
- In the Page name field, enter D_NHTSAModelData.Results to identify the page that contains the output of the data transform.
- In the Class field, enter or select GoGo-GoGoRoad-Data-NHTSAModelData-Results to identify the class of the output page.
- Configure the data transform logic.
- Click the Definition tab to configure the data transform logic.
- For step 1, in the Action drop down, select Append and Map to to create a new results page for each result returned. The data transform adds a child row labeled 1.1 below step 1.
- For step 1, in the Target field, enter Primary.pxResults.
- In the Relation drop-down, select each page in.
- In the Source field, enter D_NHTSAModelData[vehicletype:param.vehicletype,modelyear:param.modelyear,make:param.make].Results to pass the required parameters to the data page that calls the NHTSA service and caches the response.
- For step 1.1, in the Target field, enter or select .Make to set the value of the Make property on the target page.
- In the Source field, enter or select .Make_Name to identify the property to copy to the target.
- Click the plus icon twice to add steps 1.2 and 1.3 to the data transform.
- Complete the fields of steps 1.2 and 1.3 by using the information in the following table.
Action Target Source 1.2 Set .Model .Model_Name 1.3 Set .VehicleType .VehicleTypeName 
- Click to complete the configuration of the data transform.
6 Parameterize the data page to configure both service calls
Add parameters to the D_VehiclemodelsList data page and configure parameters for the aggregated data sources.
- In Dev Studio, click the D_VehiclemodelsList tab to return to the data page rule form.
- On the D_VehiclemodelsList data page rule form, click the Parameters tab to add parameters to the data page.
- In the empty row, in the Name field, enter make to define a parameter for the make to pass to the data transform.
- In the Required drop-down, select Yes to mark the parameter as required.
- Click the add icon to add a second parameter to the data page.
- In the second row, in the Name field, enter modelyear to define a parameter for the model year to pass to the data transform.
- In the Required drop-down, select Yes to mark the parameter as required.
- Click the Definition tab to resume configuration of the aggregate sources.
- For the first aggregated source, set values for the parameters passed to the data transform.
- Below the Data transform name field, click Parameters to open a dialog box for setting values to pass to the data transform.
- In the dialog box, in the Value field for the make parameter, enter param.make to pass the value of the make parameter passed to the data page.
- In the Value field for the modelyear parameter, enter param.modelyear to pass the value of the model year parameter passed to the data page.
- In the Value field for the vehicletype parameter, enter "Passenger Car" to pass a constant string.
- Click to close the modal dialog and save the parameter configuration.
- For the second aggregate source, in the Data transform name field, enter or select MapModels to call the data transform a second time to populate the data page.
- Press the [Tab] key to exit the field. The Parameters link is displayed below the Data transform name field.
- Repeat step 9 for the second aggregated source to add parameter values for the MapModels data transform by using the information in the following table.
Parameter Value make param.make modelyear param.modelyear vehicletype "Truck" - Click to complete the configuration of the data page.
7 Confirm your work
- In App Studio, click Preview application to return to the Case Manager.
- Create a new Assistance Request case.
- Advance the case to the Identify Vehicle view, completing any required fields.
- On the Identify Vehicle form, click the Configure this view icon to configure the Model drop-down list to pass the required parameters to the data page. A configuration pane is displayed on the right side of the browser window.
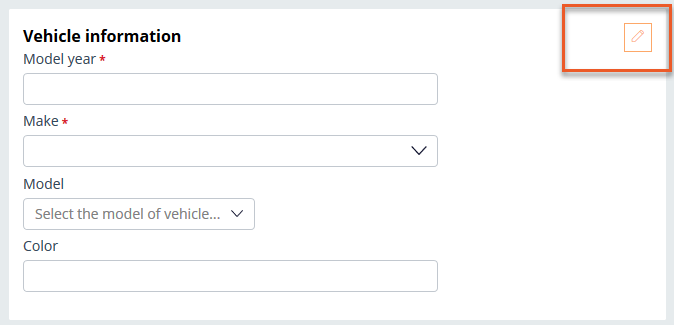
- Click the Model drop-down to display the properties of the containing view in the pane.
- Configure the Model drop-down to display values sourced from the NHTSA web service.
- In the configuration pane, hover over the Model drop-down, and then click the Edit icon to configure the field.
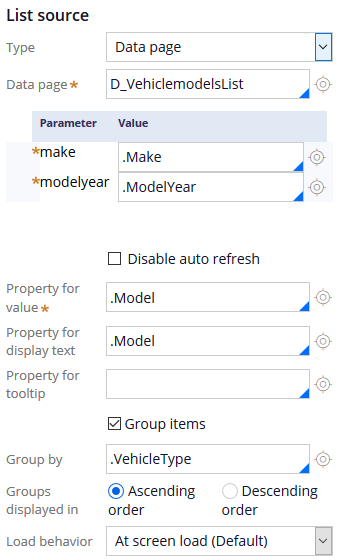
- In the List source section, clear the contents of the Data Page field.
- In the Data page field, enter or select D_VehiclemodelsList to re-select the page and update the properties pane to display the required parameters.
- In the Value field for the make parameter, enter or select .Make.
- In the Value field for the modelyear parameter, enter or select .ModelYear.
- In the Property for value field, enter or select .Model.
- In the upper right corner of the pane, click Apply to complete the configuration of the drop-down.
- Close the pane to return to the case.
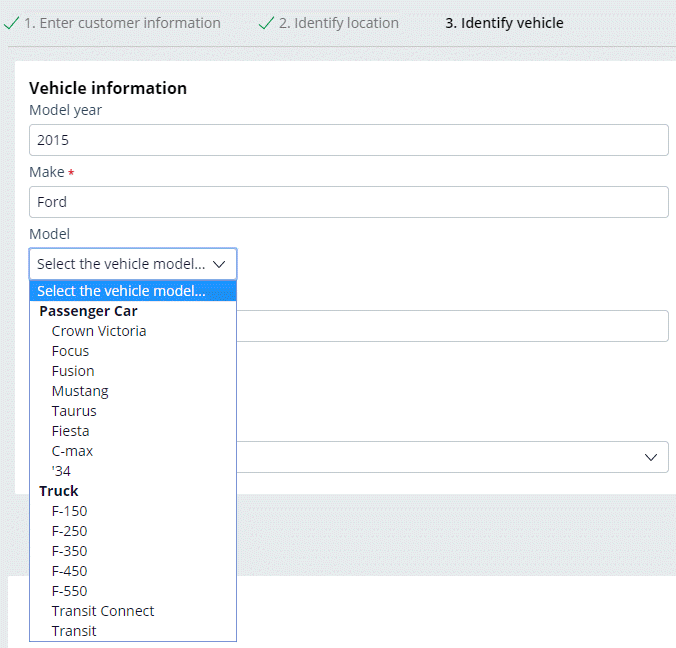
- In the Model year field, enter 2015.
- In the Make field, enter Ford.
- Click the Model drop-down to display a list of vehicle models, grouped by vehicle type.
In der folgenden Mission verfügbar:
Wenn Probleme mit den Lerninhalten auftreten, lesen Sie bitte die Pega Academy Support FAQs.
Möchten Sie uns dabei helfen, diesen Inhalt zu verbessern?