Felder in Ansichten gruppieren
3 Aufgaben
15 Min.
Szenario
Aufgrund von Feedback können die Kunden von GoGoRoad keine Details vor dem Absenden einer Unterstützungsanfrage gegenprüfen, was Unübersichtlichkeit und zusätzlichem Zeitaufwand für die Korrektur von Details nach sich zieht. Das Management-Team von GoGoRoad beschloss, einen endgültigen schreibgeschützten Bestätigungsbildschirm zu realisieren, nachdem die Kunden alle maßgeblichen Daten eingegeben haben. Auf diesem Bestätigungsbildschirm sieht der Kunde alle Daten, bevor er seine Unterstützungsanfrage absendet.
In der folgenden Tabelle finden Sie die Anmeldedaten, die Sie zur Durchführung der Challenge benötigen.
| Rolle | Benutzername | Kennwort |
|---|---|---|
| Application Developer | author@gogoroad | pega123! |
Challenge-Schritte
Genaue Übungsschritte
1 Add a Collect information step to the Enter payment information process
- In the navigation pane of Dev Studio, click Case types > Assistance Request to open the Assistance Request case type.
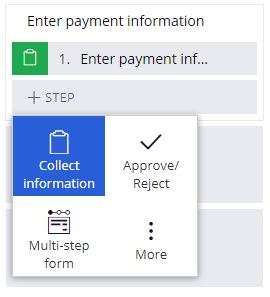
- In the Enter payment information process, click Step > Collect information to add a collect information step.
- Rename the step Review assistance request.
- On the right, in the properties pane, click Configure view to open the form editor.
- In the left pane, click Views to see the list of views.
- From the list of views, hover over and then click the Add icon for the following views:
- Enter customer information
- Identify location
- Identify vehicle
- Enter payment information
- Delete any empty rows.
- Click Submit.
- Click Save to save the changes to the Assistance Request case type.
2 Add read-only layout groups
- In the navigation pane, click App.
- Expand AssistanceRequest > User Interface > Section.
- Click ReviewAssistanceRequest to open the Review assistance request section.
- At the top of the rule, click convert to full section editor .
- In the Confirm section conversion dialog box, click Submit.
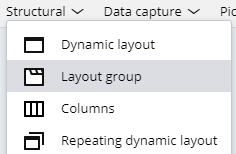
- In the section editor, click Structural, and then click and drag a Layout group above the existing Dynamic Layout.
- In the Choose layout-group format list, select Tab, and then click OK.
- Click and drag each embedded section to the layout group.
- Delete the blank dynamic layout.
- Click the Enter customer information section, and then click View properties to display the cell properties window.
- In the General tab, in the Container settings section, in Title field, enter Customer Information.
- Click the Presentation tab, and in the Edit options drop-down, select Read only (always) to make the section read-only.
- Click Submit.
- Repeat steps 10-13 to configure the remaining sections as read-only.
Section Title IdentifyLocation Service Address IdentifyVehicle Vehicle Information EnterPaymentInformation Payment Information - Click Save to save the section.
3 Confirm your work
- Create a new Assistance Request case.
- Advance the case to the Review assistance request view, entering customer, service address, vehicle, and payment information.
- In the Review assistance request view, click each tab to display the customer, service address, vehicle, and payment information. Confirm the information is read-only.
In der folgenden Mission verfügbar:
If you are having problems with your training, please review the Pega Academy Support FAQs.
Möchten Sie uns dabei helfen, diesen Inhalt zu verbessern?


