Landing pages in Cosmos React
Portals and personas
Customers interact with Pega applications through a variety of channels, such as a messaging service, voice service, mobile portal, or web portal. Use portals to design custom web interfaces for various personas in your application. Portals help you to control the content with which each user interacts.
Note: For more information on the other channels available in App Studio, see Channel interfaces.
Visibility and access privileges
Users have different needs that align with the roles they play in the case management process. Depending on the needs of your organization, set up a single portal and control the visibility of particular UI elements through personas and access privileges, or create separate portals for individual user groups. To improve user experience, design a web interface that provides them with the information and functionalities they need, and hide options that are not relevant to their role.
In the case of multiple portals, each version uses the same ready-to-use designs, which provide a reliable basis for a flexible user interface. The streamlined, single-design approach improves run-time performance and reduces development effort.
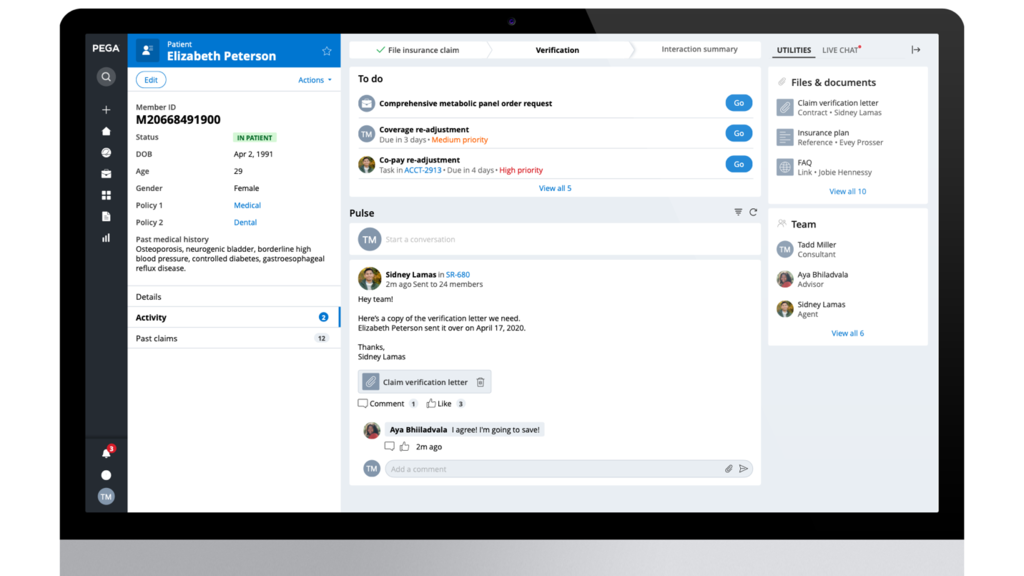
This method contributes to a cleaner user interface and makes navigation quicker and more convenient. As shown in the following image, the portal displays patient case information for a medical insurance agent.
Responsive channel authoring
End users experience the portal through a browser, regardless of device type (such as a desktop or mobile device). Portal authoring is a simple and intuitive way to create an application web channel. Configure a portal with predefined portal templates to set the screen layout and required features. The templates support responsive application development and include a mobile-only layout option.
Web Portal
By default, Pega Platform™ includes one portal for application users: the Web Portal. The Web Portal provides a standard user interface for working on cases. It is intended to be used by end users on desktop and mobile devices. For example, the Web Portal allows users to create and process cases that are assigned to them.
Landing pages
A portal consists of landing pages that consolidate information for easy access. Landing pages are top-level pages that provide users with tools and information they need to efficiently perform case management tasks.
To build an application that matches the needs of your users, create landing pages that display lists of data or landing pages that display widgets, views, and insights. Create, configure, and add landing pages to menus within your application to display specific information.
Landing pages added to a portal menu are also added to the portal. By managing the list of landing pages, customize the main menu and improve navigation and user experience.
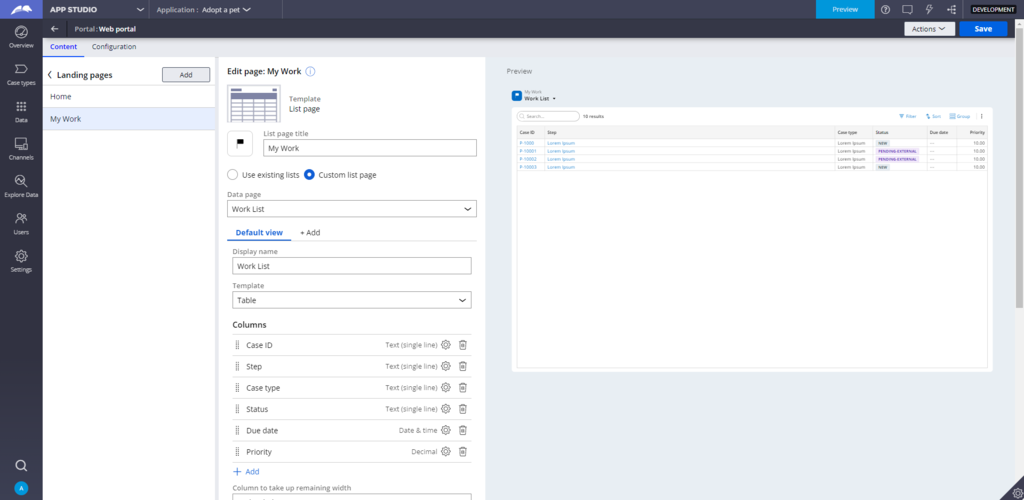
Pega Platform provides two out-of-the-box landing pages, Home and My Work. By default, the My Work landing page displays a table with a list of work items that are assigned to the user.
As shown in the following image, edit the My Work landing page from App Studio.
Landing pages menu
In App Studio, place a finished landing page within one or several application menus by using the Landing pages menu. The Landing pages menu allows you to:
- Add landing pages to an existing portal to effectively organize the content of your channel in a main menu.
- Disable an existing landing page that is no longer needed to prevent users from adding the landing page to any menu.
- Manage access to landing pages by specifying visibility by role. For example, a landing page with employee reviews is visible to only a manager.
Note: For information on creating a landing page for an application, see Creating a landing page for an application.
Check your knowledge with the following interaction.
This Topic is available in the following Module:
If you are having problems with your training, please review the Pega Academy Support FAQs.
Want to help us improve this content?

