
Launching a new offer
6 Tasks
30 mins
Beginner
English
Scenario
U+ Bank is cross-selling on the web by showing various credit cards to its customers. However, an increase in interest rates has caused an economic slowdown. As a result, the bank decides to announce a festive offer to all customers who are likely to bring in the most revenue to help create demand in the slowing economy.
U+ Bank introduces a new offer that promises 15 percent cashback to customers with a credit score of over 700. The bank also wants to promote this offer at its best by giving it a business weight of 75 percent.
Note: The value for this business lever is set at this stage for this challenge so that the offer is displayed on the U+ website first. The typical use case for a business lever is if the business wants to make a specific offer a priority.
Use the following credentials to log in to the exercise system:
| Role | User name | Password |
|---|---|---|
| Business User | BusinessUser | rules |
| Team Lead | TeamLead | rules |
| NBA Specialist | NBASpecialist | rules |
Your assignment consists of the following tasks:
Task 1: Create a change request to introduce a new action
As a Business User, submit a change request of the Sales type to create a new festive action that is suitable for customers with a credit score that is greater than 700, with a business weight of 75 percent, and a business value of 35 percent.
Task 2: Prioritize the change request created
As a Team Lead, assign a rank of 1 to the change request that the Business User submits.
Task 3: Complete the action build tasks
As an NBA Specialist, complete the various build tasks to create the action in the change request:
- Define action details.
- Configure a suitability rule (Credit score > 700).
- Design an email treatment.
- Design a web treatment with the following links:
- Content URL: https://artifacts.pegaenablement.com/images/CashBack15.png
- Click-through URL: https://uplus.xxxxxxxx.pegaenablement.com/retail_bank/offer2.html
Note: For the click-through URL, replace XXXX with the value that is specific to your exercise environment. You can copy this from the URL that is displayed in your browser.
Task 4: Review completed tasks in the build stage
As an NBA Specialist, review all the tasks that are completed in the Build stage.
Task 5: Promote the changes to production
As a Team Lead, promote the change request to the Revision Manager, who deploys the business changes to the production environment.
Note: In a real environment, after the promotion stage, there is also a deployment stage, where the Revision Manager deploys all the promoted changes to production. Because this step is time-consuming, we skip it for the purpose of this exercise.
Task 6: Verify the newly created action in CPV
As an NBA Designer, verify the newly created action in Customer Profile Viewer.
Challenge Walkthrough
Detailed Tasks
1 Create a change request to introduce a new action
- On the exercise system landing page, click Pega InfinityTM to log in to 1:1 Operations Manager.
- Log in as a Business User:
- In the User name field, enter BusinessUser.
- In the Password field, enter rules.
- In the navigation pane of 1:1 Operations Manager, click Create > Action to create a request for a new offer.
- In the Create action dialog box, select the Sales action type and complete the details about the change request:
- In the Change request name field, enter Introduce Festive Offer.
Note: The entry represents the name of the change request, not the name of the action.
- In the Completion date field, click the Calendar icon, and then select a date in the future.
- In the Description field, enter Festive offer of 15% cash back to all the customers whose credit score is more than 700.
- In the Are you making this change to fix a production defect? section, confirm that the No radio button is selected.

- Click Create.
- In the Change request name field, enter Introduce Festive Offer.
- In the Define action details window, in the Define attributes section, complete the following details:
- In the Name field, enter Introduce Festive offer.
- In the Business issue list, select Grow.
- In the Group list, select Credit cards.

- Click Continue.
- In the Define availability section, complete the following details:
- In the Availability section, confirm that Always is the default selection.
- In the Evaluation criteria list, confirm that Default: Apply arbitration, contact policies, and outbound limits.
- In the Business weight field, enter 75.
- In the Business value field, enter 35.

- Click Continue.
- In the Define engagement policy section, select the Use condition builder radio button.

- In the Intended action level list, ensure that Customer is the default selection.
- In the Intended recipient list, ensure that Eligible contact and copy to primary contact is the default selection.

- In the Suitability section, click Add criteria.

- Configure the following Suitability criteria: Customer Credit score is greater than 700.

- Click Continue to define the channel details.
Note: In the Define channel stage, there are two Treatments predefined: e-mail and web. The treatments are predefined as a result of the Sales tile selection in an earlier stage of the Change request creation process.
- In the Define channels section, in the E-mail channel group window, complete the e-mail treatment settings:
- Key code: FESTIVEOFFER
- Name: Introduce Festive offer Email Tile
- Availability: Always
- Under the Offer message text box, click AI options>Configure, to configure the details for Pega GenAI™.
 Note: You can also write the message manually.
- In the Configure AI window complete the following details:
- In the Brand voice list, select Marketing.
Note: The brand voice for Marketing was created in the previous challenge. If you aren't using the instance from the previous challenge, leave the field empty.
- In the Priniciple list, select Cialdini's principle of liking.
- In the Field description, enter Credit card Festive offer of 15% cash back.
- Click Generate to generate the results.

The message generated by the AI may differ depending on the environment. You can also generate the offer image using Pega GenAI. However the image generation requires an additional configuration.
- In the Brand voice list, select Marketing.
- Validate the message generated by the AI.
- You can regenerate, shorten, or elaborate on the message by clicking AI options>Re-generate or Shorten or Elaborate.

- You can regenerate, shorten, or elaborate on the message by clicking AI options>Re-generate or Shorten or Elaborate.
- Click AI options>Configure under the Subject line text box, to configure the subject line.
- In the Configure AI window complete the following details:
- In the Brand voice list, select Marketing.
- In the Principle list, select Cialdini's principle of liking.
- In the Field description, enter Credit card Festive offer of 15% cash back.
- Click Generate to generate the results.

- Click AI options>Configure under the Headline text box, to configure the subject line.
- In the Configure AI window complete the following details:
- In the Brand voice list, select Marketing.
- In the Principle list, select Cialdini's principle of liking.
- In the Field description, enter Credit card Festive offer of 15% cash back.
- Click Generate to generate the results.

- In the Web channel group section, complete the following details:
- Name: Introduce Festive offer Web Tile
- Placement type: Tile
- Availability: Always

- Click Finish.
- In the upper-right corner, click the user profile image, and then select Log off to log out of the application.
2 Prioritize the created change request
- Log in to 1:1 Operations Manager as a Team Lead:
- In the User name field, enter TeamLead.
- In the Password field, enter rules.
- In the navigation pane of 1:1 Operations Manager, click Change Requests.
- On the Change requests landing page, click Introduce Festive offer to open the change request.
- In the change request, in the To do list, in the Rank change request task, click Go to open the rank change request section.

- In the Rank change request section, in the Rank field, enter 1, and then click Submit.

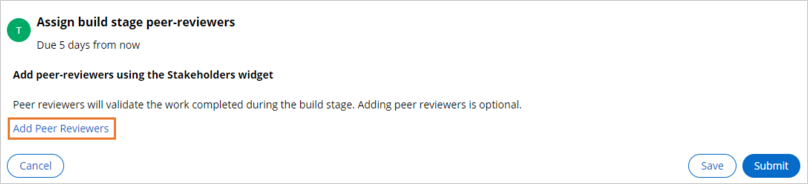
- In the To do list, in the Assign build stage peer-reviewers task, click Go to open the task.

- Click Add peer reviewers to add peer reviewers to the change request.
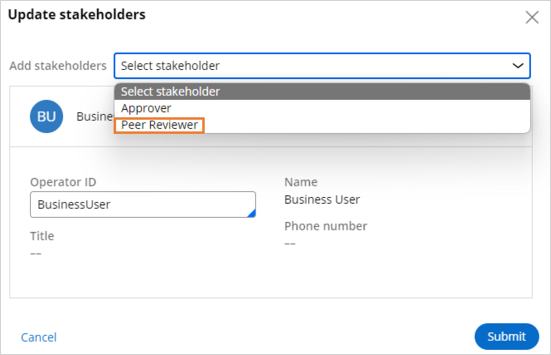
- In the Update stakeholders window, in the Add stakeholder list, select Peer Reviewer.
- In the Peer Reviewer section, in the Operator ID field, enter or select BusinessUser, and then click OK.
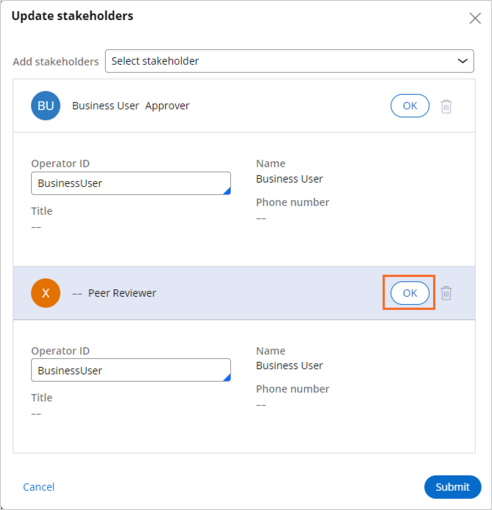
- Click Submit to close the Update stakeholders window.
- Click Submit to complete the task.
- In the upper-right corner, click the user profile image and then select Log off to log out of the application.
3 Complete the action build tasks
- Log in to 1:1 Operations Manager as an NBA specialist:
- In the User name field, enter NBASpecialist.
- In the Password field, enter rules.
- In the navigation pane of 1:1 Operations Manager, click Change requests.
- In the list of change requests, click the Introduce Festive offer to open the change request.

- In the change request, in the To do list, in the Define action details task, click the More icon, and then select Assign to myself.
- In the Define action details task, click Go.
- In the Define action details section, complete the details:
- In the Name field, enter Cashback 15 card.
- In the Identifier field, ensure that Cashback15 is selected.
- In the Business issue list, ensure that Grow is selected.
- In the Group list, ensure that Credit cards is selected.
- In the Availability, confirm that Always is the default selection.
- In the Business weight (+/-) field, ensure that the value is 75.
- In the Business value field, ensure that the value is 35.
- Click Submit to submit the action details.

- In the To do list, in the Configure engagement policy task, click the More icon, and then select Assign to myself.
- In the Configure engagement policy task, click Go.
- In the Configure engagement policy section, ensure that the Suitability condition Customer credit score is greater than 700 is active for the action level , and then click Continue.

- In the Prepare validation section, click any persona name to preview its respective values.
- Close the persona preview.
- Select the Barbara and Troy checkboxes to select the personas for validation, select Inbound web in the Channel context column, and then click Continue.
- In the Run validation section, change the desired outcome of Troy to Not receive.

- Click the Run the test icon.
- In the Result column, confirm that the status of both tests is Pass.
Barbara's credit score is 750, which satisfies the defined suitability rule (Credit score > 700), so she receives the offer. Notice that Troy is not eligible for the offer.
- Click Finish.
- In the To do list, in the Design web treatment task, click the More icon, and then select Assign to myself.
- In the Design web treatment task, click Go.
- In the Design web treatment section, complete the following details:
- In the Name field, enter Cashback 15 card web tile.
- In the Identifier field, ensure that Cashback_15_card_web_tile is automatically completed.
- In the Placement type field, confirm that Tile is the default selection.
- In the Language list, select English (United States).
- In the Content URL field, enter https://artifacts.pegaenablement.com/images/CashBack15.png.
- In the Click-through URL field, enter https://uplus.xxxxxxxx.pegaenablement.com/retail_bank/offer2.html
Note: For the click-through URL, replace XXXX with the IP address value that is specific to your exercise environment. You can copy this from the URL that is displayed in your browser.
- In the Format section, select Image.
- In the Availability section, confirm that Always is the default selection.

- Click Continue.
- In the To do list, in the Design email treatment task, click the More icon, and then select Assign to myself.
- In the Design email treatment task, click Go.
- In the Design email treatment section, complete the following details:
- In the Name field, enter Cashback 15 card email tile.
- In the Identifier field, ensure that Cashback_15_card_email_tile is automatically completed.
- In the Language list, select English (United States).
- Ensure all the AI-generated fields are correct and meet the business needs.
Note: NBA Specialist has right to re-generate the GenAI messages if needed.
- In the Destination list, select GenericDBTemplate.
- In the Availability section, confirm that Always is the default selection.
- Click Continue.

4 Review completed tasks in the build stage
- In the To do list, in the Generate artifacts from tasks task, click the More icon, and then select Assign to myself.
- In the Generate artifacts from tasks task, click Go.
- Review the generating artifacts and click Generate.

- Confirm that the action status is RESOLVED-COMPLETED.

- In the navigation pane of 1:1 Operations Manager, click Change requests.
- In the list of change requests, click Introduce Festive offer to open the change request.
- In the To do list, in the Validate artifacts task, click the More icon, and then select Assign to myself.
- In the Validate artifacts task, click Go.
- In the Validate artifacts section, review the generated artifacts and click Submit.
- Confirm that the change request status is DEPLOYMENT READY.

- In the upper-right corner, click the user profile image, and then click Log off to log out of the application.
5 Promote changes to production
- Log in to 1:1 Operations Manager as a team lead:
- In the User name field, enter TeamLead.
- In the Password field, enter rules.
- In the navigation pane of 1:1 Operations Manager, click Change Requests.
- In the list of change requests, click Introduce Festive offer to open the change request.
- In the To do list, in the Complete this change request task, click the More icon, and then select Assign to myself.
- In the Complete this change request task, click Go.
- In the Complete this change request section, click Approve.
- Confirm that the action status is RESOLVED-COMPLETED.

- In the upper-right corner, click the user profile image, and then click Log off to log out of the application.
6 Verify the newly created action in CPV
- Log in to Customer Decision Hub as an NBA Designer:
- In the User name field, enter NBADesigner
- In the Password field, enter rules.
- In the header of Customer Decision Hub, click Reports > Customer Profile Viewer.

- On the Customer Profile Viewer landing page, complete the following details:
- In the Type list, select Customer name.
- In the Customer name field, enter Barbara Stockton.
- Click View.
Note: In CPV, you must search for Barbara's profile because the newly created action passed the test for Barbara during testing. As a result, Barbara is eligible for this action and she receives the new offer.
- In Barbara's profile, click the Next best actions tab.
- In the Channel context list, select Web Inbound, and then click Make decision.

- Analyze the results for Barbara.

- In the Direction list, select Outbound, and then click Make decision.

- Analyze the results for Barbara.
 Note: In this case only one e-mail treatment is available in the system.
This Challenge is to practice what you learned in the following Modules:
Available in the following mission:
If you are having problems with your training, please review the Pega Academy Support FAQs.
Want to help us improve this content?