Managing application access
1 Task
5 mins
Beginner
Security
English
Scenario
GoGoRoad product managers want to restrict access to development on the New Vendor case type so that only approved roles perform updates. Configure permissions on the New Vendor case type to prevent anyone with the User role from performing any actions on the case type.
The following table provides the credentials you need to complete the challenge.
| Role | User name | Password |
|---|---|---|
| Developer | author@gogoroad | pega123! |
| Customer Service Representative | CSR@gogoroad | pega123! |
| Territory Manager | territorymgr@gogoroad | pega123! |
Note: Your practice environment may support the completion of multiple challenges. As a result, the configuration shown in the challenge walkthrough may not match your environment exactly.
Challenge Walkthrough
Detailed Tasks
1 Set permissions for the User role on the Access Manager
- Log in with the developer credentials provided in the scenario.
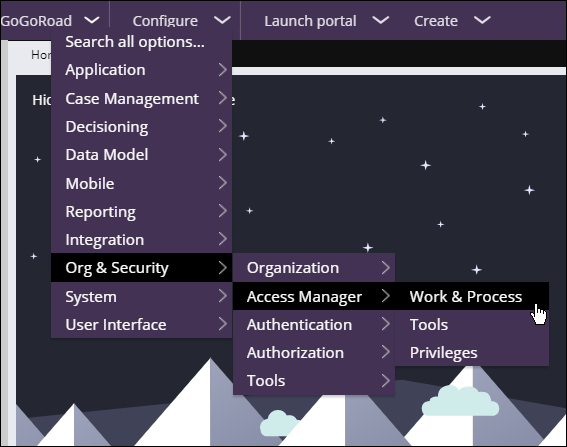
- In the header of Dev Studio, click Configure > Org & Security > Access Manager > Work & Process to view role-based authorizations for each case type in your application.
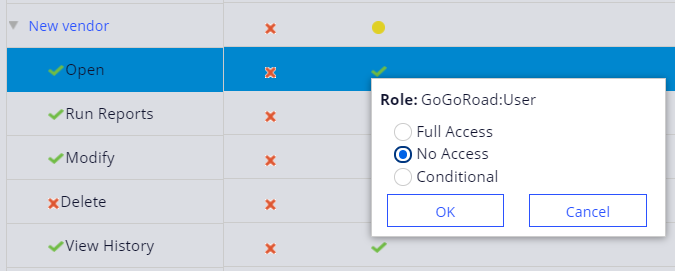
- In the Access Group drop-down, select GoGoRoad:Users to view authorizations for the User role.
- Under Case Types, expand New Vendor to display the child rows.

- To the right of Open, in the GoGoRoad:User column, click the Full Access check mark to update the access when opening instances of the New Vendor case type.
- Select No Access, and then click OK to set the authorization.
- For the following rows, repeat steps 5 and 6 to set each child row to No Access authorization.
Case type Application work type Role based authorization New vendor Run Reports No Access New vendor Modify No Access New vendor View History No Access 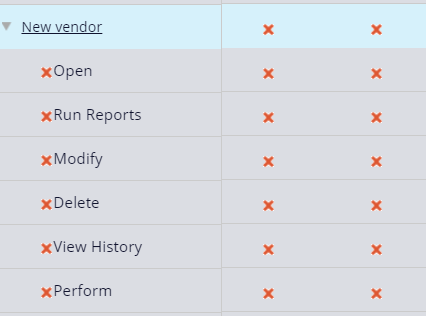
Note: Changes in the Access Manager are saved automatically. You can click the Refresh Page icon under Access Group to verify that changes saved.
If you are having problems with your training, please review the Pega Academy Support FAQs.
Want to help us improve this content?