
Merging a development Branch
Archived
3 Tasks
30 mins
Intermediate
Installation and Deployment
English
Scenario
The Payroll Setup case type allows users to automatically deposit their paychecks into a checking or savings account. On the Provide bank information step, employees enter the name of their financial institution, the routing number for the financial institution, and their account number.
This manual data entry leads to errors that cause the first deposit to fail. To reduce the number of errors, the Human Resources (HR) department requested that users select their financial institution from a drop-down list so that the application populates the routing number on the form.
Another development team redesigned the form. To avoid conflicts, this team configured the changes in a development branch. You are responsible for merging the changes into the application.
Merge the contents of the development branch labeled Branching into the HRApps and TGB rulesets. The branch rulesets are locked with the password rules.
Note: This scenario describes the original state of the form to enable you to confirm that the merge worked correctly. To gain an understanding of the configuration changes, you can explore the branch before performing the merge.
The following table provides the credentials you need to complete the exercise.
| Role | User name | Password |
|---|---|---|
| Senior System Architect | SSA@TGB | rules |
Note: Your practice environment may support the completion of multiple challenges. As a result, the configuration shown in the challenge walkthrough may not match your environment exactly.
Challenge Walkthrough
Detailed Tasks
1 Add the branch to the application rule
-
Open the HRApps application record.
Tip: You can access the application record from the Application menu. Open the Application menu and select Definition. -
Under Development branches, click Add branch. The Add a Branch ID dialog is displayed to allow you to specify the name of the branch to add.

- In the Branch name field, enter Branching.
- Click Submit. The dialog is dismissed and the branch is added to the application rule.
- Save the change to the application record.
2 Merge the branch contents into the HRApps and TGB rulesets
-
In the Development branches section of the application record, click Branching to display the content of the branch. The branch displays a table of the rule names and other metadata fields.
-
Select the Branch quality tab to review guardrails warnings, merge conflicts, and unit test coverage for all rules contained in the branch.
-
From the Actions menu, select Merge to display a Merge branch dialog.
- Click Proceed to display the Merge Branches screen.
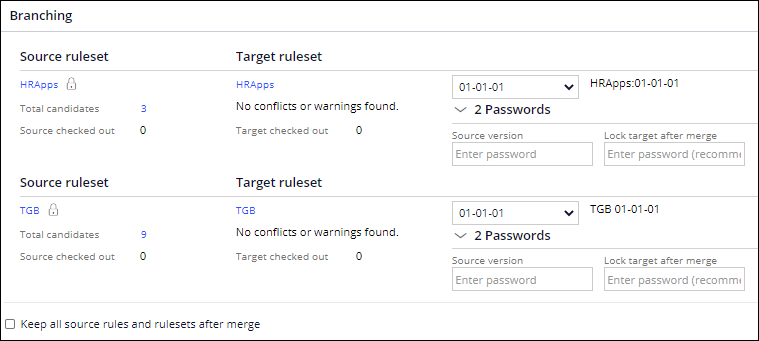 Note: The counts for Target checked out and Warnings should be zero (0) but may vary according to how you have developed your application. If the Target checked out count for a target ruleset is not zero, click the number to identify the rule or rules that are checked out in the application ruleset. Then, click the Total candidates number for the branch ruleset and confirm that the rules in the branch are not the same rules that are checked out.
 -
For each target ruleset, select the highest available ruleset version.
Note: If you performed the Creating a new application version exercise, the highest available version for each version is 01-01-02. Otherwise, the highest available version for each ruleset is 01-01-01. - For each ruleset, in the Source version field, enter rules as the password.
- Optional: Click the Keep all source rules and rulesets after merge check box to prevent Pega from deleting the branch ruleset and allow you to repeat the exercise.
- Click Merge. The Merge Branches wizard displays a confirmation page to indicate that the merge was successful.
- Return to the application record.
- In the Development branches section, click the trash can icon next to the branch to remove it from the application.
- Save the change to the application record.
3 Confirm your work
- Create a new Payroll Setup case.
-
Advance the case to the Provide bank information view. Verify that the bank name field is now a drop-down list and that selecting a bank from the list populates the routing number field automatically.
