
Managing application access

2 Aufgaben

5 Min.

Visible to: All users
Anfänger
Pega Platform '24.2
Security
Englisch
Prüfen Sie die Version, um sicherzustellen, dass Sie mit dem richtigen Inhalt arbeiten, oder schließen Sie die neueste Version ab.

Szenario

GoGoRoad Product Managers want to restrict access to development on the New Vendor Case Type so that only approved roles can perform updates. Configure permissions on the New Vendor Case Type to prevent anyone with the User role or the Auditor role from performing any Actions on the Case Type.

The following table provides the credentials you need to complete the challenge:

Role User name Password
Application Developer author@gogoroad pega123!
User user@gogoroad pega123!
Territory Manager territorymgr@gogoroad pega123!
Auditor auditor@gogoroad pega123!

Sie müssen zum Abschließen dieser Challenge Ihre eigene Pega-Instanz starten.

Die Initialisierung kann bis zu 5 Minuten dauern, bitte haben Sie Geduld.

Challenge-Schritte

Genaue Übungsschritte

1 Set permissions for the User role in App Studio

  1. In the Pega Platform™ instance for the challenge, enter the following credentials:
    1. In the User name field, enter author@gogoroad.
    2. In the Password field, enter pega123!.
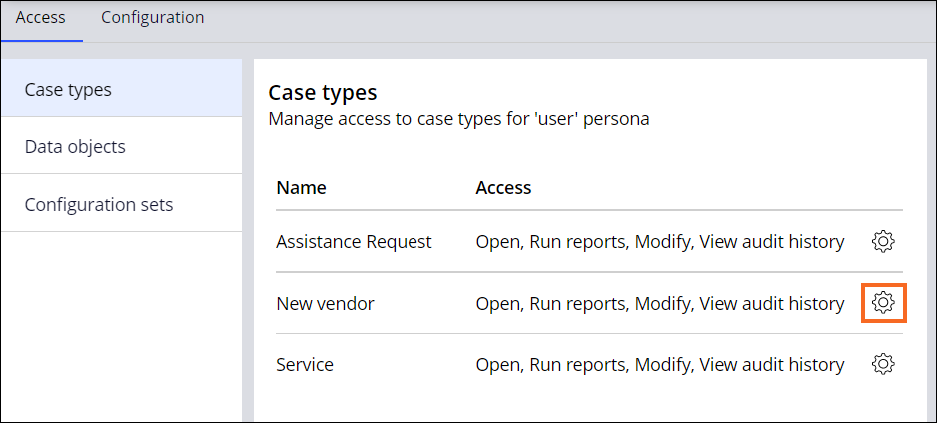
  2. In the navigation pane of App Studio, click Users > User management to display the Personas that are associated with the application.
    User management in App Studio
     
  3. Click Users to view the authorizations for the User Persona.
    Users Persona in User management
  4. In the New Vendor row, click the Configure access icon. 
    Portals & Pages landing page, Configure access icon
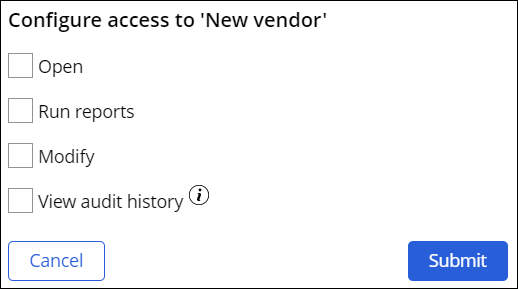
  5. In the Configure access to 'New vendor' dialog box, clear all the checkboxes, and then click Submit.
    Configure access to 'New Vendor' dialog with all checkboxes cleared
Hinweis: The system automatically saves changes on the Persona access landing page.

2 Set permissions for Auditor role in Dev Studio

  1. Switch to Dev Studio.
  2. Click Configure > Org & Security > Access Manager to open the Access Manager.
    Select Access Group Auditor
  3. In Organization and Security: Access Manager, in the Access Group list, select GoGoRoad:Auditor.
  4. To the left of New Vendor, click the arrow to expand the child rows.
  5. In the Open row, click on the green checkmark in the GoGoRoad:AuditorManaged Role column.
    Access manager with callouts
  6. Select No access and click OK.
    Select no access
  7. Repeat steps 5 and 6 and confirm Modify, Run Reports, Delete, Perform, View History rows are set to No access.
  8. Click Refresh to confirm the changes. 
    Access Manager settings for Auditor role

Arbeit überprüfen

  1. In the lower-left corner of the window, click the profile icon, and then click Log off to log out of Pega Platform.
    Dev Studio Log off
  2. In the Pega Platform instance for the challenge, enter the following credentials:
    1. In the User name field, enter user@gogoroad.
    2. In the Password field, enter pega123!.
  3. Click Create.
  4. Confirm that the Create dropdown has no option to create a New Vendor Case.
    Modified User Portal
    Hinweis: In In Pega Infinity™ '23 and older versions, restricted Case Types are not hidden from the Create menu. Instead, clicking on the New Vendor Case Type pops up an error message that indicates you are not authorized to create, modify, or lock New Vendor Case instances.
  5.  In the upper-right corner of the window, click the profile icon, and then click Log off to log out of Pega Platform.
  6. In the Pega Platform instance for the challenge, enter the following credentials:
    1. In the User name field, enter auditor@gogoroad.
    2. In the Password field, enter pega123!.
  7. Repeat steps 3 to 5 to confirm there is no option to create New Vendor Case for the Auditor and log off.
  8. In the Pega Platform instance for the challenge, enter the following credentials:
    1. In the User name field, enter territorymgr@gogoroad
    2. In the Password field, enter pega123!.
  9. Click Create > New vendor.
  10. Confirm that the create View displays a new instance of the New Vendor Case Type.
    Create New Vendor
    Hinweis: Other roles, such as Manager, can also create a New Vendor Case and provide vendor information.

In dieser Challenge üben Sie, was Sie im folgenden Modul gelernt haben:


In der folgenden Mission verfügbar:

Wenn Probleme mit den Lerninhalten auftreten, lesen Sie bitte die Pega Academy Support FAQs.

Fanden Sie diesen Inhalt hilfreich?

Möchten Sie uns dabei helfen, diesen Inhalt zu verbessern?

We'd prefer it if you saw us at our best.

Pega Academy has detected you are using a browser which may prevent you from experiencing the site as intended. To improve your experience, please update your browser.

Close Deprecation Notice