フォームビューの設定
2 タスク
10 分
初級
ユーザーエクスペリエンス
Constellation
日本語
シナリオ
ロードサイドアシスタンスのリクエストが承認されると、システムはServiceケースを作成します。CSRには、Assistance Requestケースに関連する情報を簡単に確認できる機能が必要です。
Confirm request detailsビューは、2列のレイアウトで設定されています。ビューの設定により、Caseステップのインストラクションが上書きされます。「Assistance Request Info」の見出しは表示されません。
以下の表は、チャレンジに必要なログイン情報をまとめたものです。
| ロール | ユーザー名 | パスワード |
|---|---|---|
| アプリケーション開発 | author@gogoroad | pega123! |
補足: 練習環境では、複数のチャレンジの完了をサポートする場合があります。その結果、チャレンジのウォークスルーに表示される設定は、お客様の環境と完全に一致しない場合があります。
補足: このミッションは、Infinity 24.2のリリース日に先駆けて社内で公開されています。チャレンジ環境は、ミッションが外部で公開された時点で使用可能になります。
チャレンジ ウォークスルー
詳細なタスク
1 Confirm request detailsビューを編集する
- チャレンジのPegaインスタンスに、以下のログイン情報を入力します。
- User nameフィールドに「author@gogoroad」と入力します。
- Password フィールドに「pega123!」と入力します。
- App Studioのナビゲーションペインで、「Case Types > Service」をクリックします。
- Confirm request detailsステップをクリックして、右側にコンテキスチャルプロパティペインを表示します。
- コンテキスチャルプロパティペインで、「Configure View 」をクリックしてConfirm request detailsビューを設定します。
- Layout リストで、「 2 column」を選択し、表示を1列から2列に変更します。
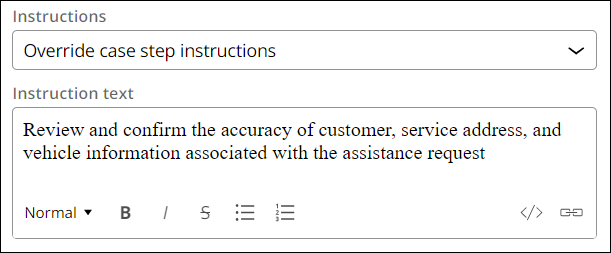
- Instructions リストで「Override Case Step instructions」を選択します。
- Instruction textフィールドに「Review and confirm the accuracy of customer, service address, and vehicle information associated with the assistance request」と入力し、ケースステップのインストラクションを上書きします。
- Assistance Request Infoの右側にある「Configure」をクリックします。
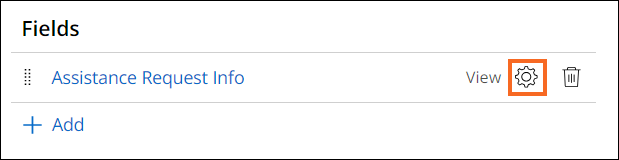
- 「Configure View: Assistance Request Info」ダイアログボックスで、Show headingチェックボックスをオフにします。
- 「Save 」をクリックして「Configure View: Assistance Request Info」ダイアログボックスを閉じます。

2 Service addressビューのフィールドを並べ替える
- 「Assistance Request Info 」をクリックして、Edit View: Assistance Request Infoウィンドウを表示します。
- 「Service address ( Service address ) 」をクリックして、Edit View: Assistance Request Info - Service address ウィンドウを表示します。
- Region Aで、Street フィールドをドラッグしてRegion Aの最初の位置にドロップします。
 補足: これは共有ビューです。共有ビューに加えた変更は、共有ビューを再利用する他のビューに影響します。
 - 「Submit 」をクリックして、Confirm request detailsビューとService addressビューの設定を完了します。
- 「Save 」をクリックしてServiceケースへの変更を保存します。
このチャレンジは、下記のモジュールで学習したことを実践するための内容です。
- フォームビューの設定 v2
このモジュールは、下記のミッションにも含まれています。
トレーニングを実施中に問題が発生した場合は、Pega Academy Support FAQsをご確認ください。