アプリケーション開発管理の追加タスク

次の関連タスクは、このモジュールに付随するチャレンジではカバーされていません。 このコンテンツを確認してください。このコンテンツでは、さまざまなユースケースを示し、これらの追加タスクを完了するための手順を説明しています。 これらのタスクは認定の対象です。 試験では、これらのタスクに関する問題が出題される場合があります。

ストーリー テンプレートの入力

Automate the creation of stories by populating the columns in a story template with functional requirements. By implementing stories, you can track, manage, and communicate development of your projects. For example, you can define which stories contain features that are essential to your application, so that your development team can prioritize their work.

  1. Download a story template:
    1. In the navigation pane of App Studio, click Overview.
    2. In the Application profile section, click Manage.
    3. In the Application profile header, click Actions Import stories .
    4. In the Import stories window, download a story template .xlsx file to your local computer by clicking Download the template.
    5. Open the file.
  2. In the Name column, enter text that summarizes what users can do with the functionality that the story delivers.

    If you enter duplicate names, your application creates stories with the same name but different IDs.

  3. Optional: Add supporting information to the story:
    1. In the Description column, enter text that describes the new functionality to implement, the key stakeholders to involve, and the relevant business value.
    2. In the Associated feature ID column, enter the ID of the feature that this story implements.

      For more information about feature IDs, see Finding a feature ID.

      Result: During import, your application promotes features from the built-on application or previous versions, to the current version of your application.
    3. In the Complexity column, select an option to indicate the level of effort that is needed to complete the story.
    4. In the Priority column, select the importance of the story, relative to other stories in the product backlog, to indicate appropriate time for the team to start work on the story.
    5. In the Acceptance criteria column, enter specific metrics or constraints to consider before the team can resolve the story.
    6. Optional: To define more than one criterion, press the Alt and Enter keys to insert a line break in the cell, and then repeat substep 3.e.
  4. Optional: To add more stories to the template, repeat steps 2 through 3.
  5. Save and close the file, without changing the file format.
What to do next: Import a story template into Agile Workbench. For more information, see Importing story templates.

    機能拡張のリクエスト

    Improve and adjust an application to your specific business needs by requesting a feature enhancement. You request an enhancement by creating a feedback item. Your development team triages feedback items and decides whether to implement or reject the enhancement, based on priority and available resources.

    Before you begin: To provide context for the team and to speed up feature development through videos or screenshots, log in to your application in Google Chrome by using the HTTPS protocol.
    1. In the header of App Studio, click the Agile Workbench icon.
    2. Optional: To record a video or take screenshots, in the Agile Workbench tool, add the Pega Screen and Video Capture extension to your browser by clicking Install the plugin at the bottom of the tool, and then following the instructions in Google Chrome.
    3. In the header of the Agile Workbench tool, click Create work item Create Feedback .
    4. In the Name field, enter text that summarizes the change.
    5. In the Description field, enter text that includes the rationale for the change and details, such as use cases or metrics, that can help the team decide how to triage the feedback.
    6. In the Associated feature list, select a feature that relates to the enhancement.
    7. In the Priority field, select the relative importance of the enhancement.
      During triaging the development team uses this field to determine when they implement the feedback relative to other items in the product backlog.
    8. Optional: To add an attachment, click Add attachment, and then select the attachment type:
      Choices Actions
      Record a video
      1. On the Attachments menu, click Record video.
      2. In the Share your screen window, select a screen that you want to record, and then begin the recording by clicking Share.
      3. In the timer window, stop the recording by clicking Stop.
      Take a screenshot
      1. On the Attachments menu, click Capture screen.
      2. Drag the target pointer onto the screen area that relates to the feature enhancement.
      3. In the text field below the target pointer, enter additional information about the bug, and then click Capture screen.
      4. In the Share your entire screen window, select a screen that you want to capture, and click Share.
      Attach a file
      1. On the Attachments menu, click Attach files.
      2. In the Attach file(s) window, select the files that you want to upload, and then click Attach.
      Attach a URL
      1. On the Attachments menu, click Attach URL.
      2. In the Attach a link window, in the Name field, enter a descriptive name for a URL.
      3. In the URL field, enter the URL.
      4. In the Attachment category list, select URL.
      5. Click Submit.
    9. Click Save.
    For example: The following figure shows a sample feedback item that captures a requirement to provide alternative dates when a user books a stay at a hotel and the selected dates are unavailable:
    Sample feedback item
    Agile Workbench with a sample feedback item request.
    Agile Workbench with a sample feedback item request.
    What to do next: Discuss the feedback item with a development team. For more information, see Collaborating with development teams.

    開発チームとのコラボレーション

    Improve and accelerate your project delivery by collaborating with development teams by using Pulse. When you post Pulse messages, you ensure that team members have up-to-date and relevant information about the features that they implement.

    You can post general messages that users see in the Developer collaboration section, or comment on specific work items, such as stories and bugs in Agile Workbench. You can also filter, comment on, and like messages.
    1. In the header of App Studio, choose the context for your message:
      • To post a general message, click the Toggle developer collaboration icon.
      • To comment on a work item, such as a user story, a bug, or a feedback item, click the Toggle Agile Workbench icon, and then in the list of work items, select an item that you want to discuss.
    2. In the Post text field, enter your message.
    3. Optional: To provide more information and context to your message, add an attachment:
      1. Below the text field, click the Add attachment icon.
      2. In the dialog box that appears, select a local file that you want to attach.
      3. Attach the file to the message by clicking Open.
    4. Optional: To emphasize specific information in your message, format your text by clicking the Formatting help icon, and then copying special characters into the message. For example: You can write a part of your message in bold or italics.
    5. Optional: To provide only relevant information to users, make your post visible only to specific users:
      1. Above the text field, click Post Private message .
      2. In the Add users field, enter or select the IDs of the users that you want to be able to view the post.
      By default, everyone in the application can view posts.
    6. Click Post.
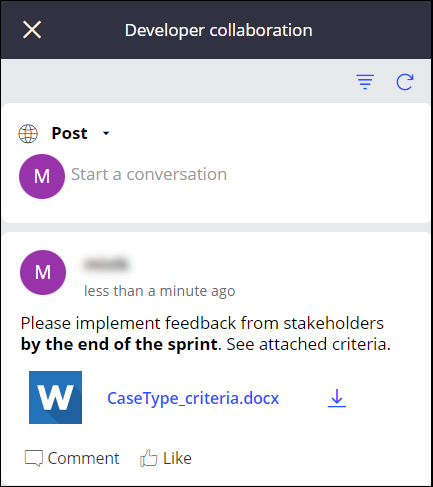
    For example: The following figure shows a Developer collaboration section with a Pulse message that includes styling and an attachment:
    Developer collaboration section
    A Pulse message posted in the Developer collaboration section.
    A Pulse message posted in the Developer collaboration section.

      If you are having problems with your training, please review the Pega Academy Support FAQs.

      このコンテンツは役に立ちましたか?

      このコンテンツは 50% のユーザーにとって役に立ちました。

      改善できるところはありますか?

      We'd prefer it if you saw us at our best.

      Pega Academy has detected you are using a browser which may prevent you from experiencing the site as intended. To improve your experience, please update your browser.

      Close Deprecation Notice