
Creating a decision strategy
Introduction
Decision strategies drive the next best action. The strategies comprise a unit of reasoning represented by decision components. How these components combine determines which action is selected for a customer: the next best action. Learn the type of decision components and how they are used to create decision strategies. Gain hands-on experience designing and executing your own next-best-action decision strategy.
Video
Transcript
This demo will show you how to create a new decision strategy.
It will also describe three important decision components and the types of properties available for use in expressions during strategy building.
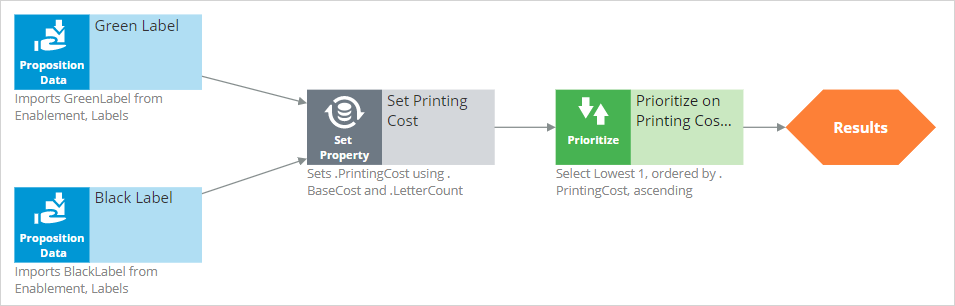
In this demo, you will build a Next-Best-Label strategy. The Next-Best-Label strategy is a sample strategy, used to illustrate the mechanics of a decision strategy.
Start by creating a new strategy from scratch.
Decision strategies output actions, utilizing the so-called Strategy-Results class.
The Strategy-Results class limits the output of the strategy to the actions contained in the Business issue and Group.
The strategy you build will select a Label action from a set of predefined actions. The Label action selected will be the one with the lowest printing cost.
Notice that the complete definition of the Next-Best-Label strategy needs to include a reference to the PegaCRM-Data-Customer class.
This is the Apply To class, and it indicates the context of the strategy.
It ensures that from within the strategy, you have access to customer-related properties such as Age, Income, Address, and Name.
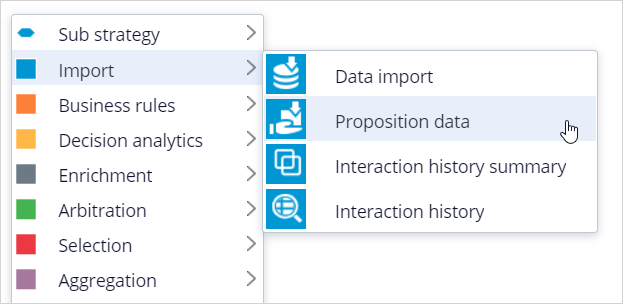
You can now start building the strategy. Right-click on the canvas to get the Context menu, which shows all component categories.
The first component to add is an Import component.
By expanding the Import category, you can see the Import component types available.
In this case, you need a Proposition Data component to define the actions that will be considered by the strategy.
Now you need to configure the component. First, right-click to open the Proposition Data properties panel.
Notice that the Business issue and Group are grayed out.
This cannot be changed because the Enablement Business issue and Labels Group have already been selected for this decision strategy.
By default, the strategy will import all actions within that Group, unless you select a specific action.
For this component, you only want to import the Green Label, so let’s select that.
Selecting the action from the drop-down menu automatically gives the component the appropriate name.
The description, which will appear under the component on the canvas, will also be generated automatically.
If you want to create your own description, you can do so by clicking the Use custom radio button.
Now you want to import a second action into the strategy. You can use the Copy and Paste buttons to quickly add more Proposition Data components to the canvas.
You can use Alignment Snapping and Grid Snapping for easy placement of the components.
By turning these off, you can place a component anywhere on the canvas, but it makes it more difficult to align the shapes.

Now you need to add the next component in the strategy, which is an Enrichment component called Set Property.
You can add this component to the canvas by selecting it from the component menu.
Next, connect it to the Proposition Data components.
Ultimately, the result of this strategy should be the Label action with the lowest printing cost.
This printing cost is the sum of a base printing cost, which is specific to each label, and a variable cost, which depends on the number of letters.
The Set Property component is where you will calculate the printing cost for each of the actions.
The information in the Source components tab is populated automatically by the Proposition Data components connected to this component.
Notice that the Black Label action is in the first row.
On the Target tab, you can add properties for which values need to be calculated.
Click Add Item to create the equation that will calculate the printing cost for each of the components.
Begin by setting the Target property to ‘dot’ PrintingCost.
In Pega, all inputs begin with a dot. This is called the dot-operator and it means that you are going to use a strategy property.
The PrintingCost property is a new strategy property that does not yet exist.
To create the new PrintingCost strategy property, click on the icon next to the Target field.

By default, the property type is Text. In Pega, there are various types supported. In this case, the PrintingCost is a numeric value, so change its type to Decimal.
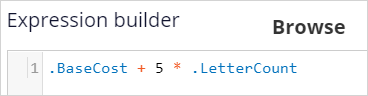
Next, you need to make PrintingCost equal to the calculation you create. To create the calculation, click on the icon next to the Source field.
Using the Expression Builder, you can create all sorts of complex calculations, but in this use case, the computation is very basic.
PrintingCost should equal BaseCost + 5 * LetterCount.
To access the BaseCost you type a dot. Notice that when you type the dot, a list of available and relevant strategy properties appears.
This not only makes it easy to quickly find the property names you’re looking for; it also avoids spelling mistakes.
In a decision strategy, you have two categories of properties available to use in Expressions.
The first category contains the strategy properties, which can be one of two types.
An Action property is defined in the Action form. Examples are the BaseCost and LetterCount properties you are using here.
These properties have a value defined in the Action form and are available in the decision strategy via the Proposition Data component.
The property values can be overridden in the decision strategy but will often be used as read-only.
The second type of strategy property is a calculation like the one you just created, PrintingCost. Such calculations are often created and set in the decision strategy.
These types of properties are either used as transient properties, for temporary calculations, or for additional information you want the strategy to output.
The second category contains properties from the strategy context, also called customer properties.
Suppose you want to use a customer property in your expression, such as Age or Income.
In that case, you would have to type the prefix ‘Customer dot’, instead of just dot.
This is the list of available properties from the strategy context, also known as Customer properties.
For now, you calculate the printing cost for each action that does not use customer properties.
Finalize the expression.
Even though you used the dot-operator to build your Expression, it’s best practice to validate it, so click Test.
If the Expression isn’t valid, you will receive an error message on screen.
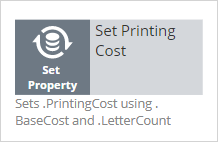
On the canvas, you can see the automatically generated description for the component: Sets PrintingCost using BaseCost and LetterCount.
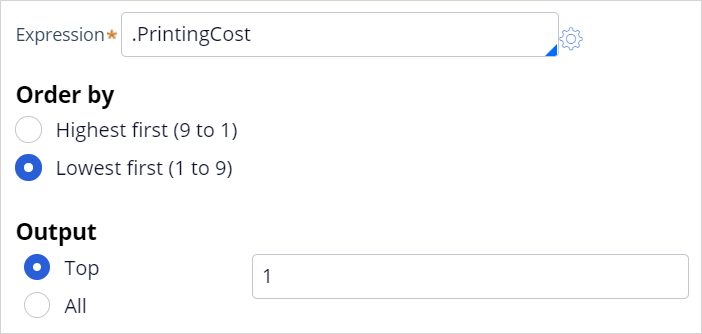
Now you want to ensure that the actions will be prioritized based on the lowest printing cost. So, you need to add the Prioritize component from the Arbitration category.
The prioritization can either be based on an existing property, or it can be based on an equation. Let’s select an existing property using the dot construct.
Here you can select the order in which the top actions are presented. Since you are interested in the lowest printing costs, configure it accordingly.
You can also select the number of actions that will be returned by the strategy.
If you want to output only one label, select Top 1 here.
Now you can connect the components and save the strategy.
To test the strategy, first, check it out. Then, expand the right-hand side test panel and click Save & Run to examine the results.
You can view results for any of the components by selecting that component.
If more than one action is present, each one is presented as a Page.
For the Set Property component, the Results contain a page for the Black Label and one for the Green Label.
For the Black Label, the PrintingCost is 70.
For the Green Label, the PrintingCost is 60.
On the canvas, you can show values for strategy properties such as Printing Cost.
For this exercise, you execute this strategy against a Data Transform called UseCase1.
If you open UseCase1, you can see the customer data the strategy uses when you run it.
To test the strategy on a different use case, you can create a Data Transform with different properties.
You can also select a Data Set that points to an actual live database table.
This demo has concluded. What did it show you?
- How to create a decision strategy from scratch.
- How to configure Proposition Data, Set Property, and Prioritize decision components.
- How to build expressions in strategies.
- The two categories of properties available for expressions.
- How to test a decision strategy using a use case stored in a data transform.
This Topic is available in the following Modules:
If you are having problems with your training, please review the Pega Academy Support FAQs.
Want to help us improve this content?