BAのConstellationでのビューの作成
6 タスク
40 分
初級
データ統合
日本語
シナリオ
ユーザーがGoGoRoadアプリケーションを操作するには、ユーザーインターフェイス(UI)を作成する必要があります。アプリケーション開発とメンテナンスの両方でCons constellationの利点に着目しているあなたは、Pega BAとして、Constellationアーキテクチャを使用したGoGoRoadアプリケーションのUI構築を提案しています。
ユーザーストーリー
GoGoRoadのカスタマーサービスの担当者(CSR)として、リクエストされたサービスのタイプをドロップダウンリストから選択することで、問題をすばやく特定し、サービスプロバイダーにその情報を提供できるようにしたいと考えています。
GoGoRoadのCSRとして、顧客のドロップダウンリストからアシスタンスリクエストを行う顧客を選択することで、顧客に関して保存されているすべての情報にすばやくアクセスできるようにしたいと考えています。
GoGoRoadのCSRとして、サービスリクエストに関連付けられた住所を入力することで、サービスプロバイダーを正しい場所に派遣できるようにしたいと考えています。
GoGoRoadのCSRとして、サービスを必要とする車両に関連付けられた情報を入力することで、サービスプロバイダーにその情報を提供できるようにしたいと考えています。
GoGoRoadのCSRとして、顧客の支払い方法に関連付けられた情報を入力することで、提供したサービスの対価がGoGoRoadとサービスプロバイダーに必ず支払われるようにしたいと考えています。
GoGoRoadのCSRとして、Assistance Requestインスタンスに提供されたサービスを選択することで、顧客に正しく請求できるようにしたいと考えています。
システムアーキテクトが文書化したテクニカルノート
- Identify issueビューには、Picklist Field Typeの「Service type」という名前の新しいフィールドが含まれています。Service typeフィールドは必須です。
- Identify customerビューには、Customer (AR)データリレーションシップを参照するドロップダウンリストが含まれています。
- Identify locationビューには、Service address (AR)Embedded Dataデータリレーションシップが含まれています。
- Identify vehicleビューには、Vehicle informationデータオブジェクトを単一レコードのEmbedded Dataリレーションシップとして参照する「Vehicle information (AR)」という新しいフィールドが含まれています。
- Enter payment informationビューには、Payment informationデータオブジェクトを単一レコードのEmbedded Dataリレーションシップとして参照する「Payment information (AR)」という新しいフィールドが含まれています。
- Select services performedビューには、Selected serviceデータオブジェクトを複数レコードのEmbedded Dataリレーションシップとして参照する「Selected services (AR)」データリレーションシップが含まれています。
- Select services performedビューには、ビューで選択されたすべてのサービス合計が表示される、「Total of services」という、以前に作成された計算フィールドが含まれています。
以下の表は、チャレンジに必要なログイン情報をまとめたものです。
| ロール | ユーザー名 | パスワード |
|---|---|---|
| ビジネスアーキテクト | author@gogoroad | pega123! |
補足: このチャレンジウォークスルーはPega Platform '23で録画されました。このビデオとチャレンジ内容の間で手順や画像に多少の違いが見られるかもしれません。
チャレンジ ウォークスルー
詳細なタスク
1 Identify issueビューを設定する
- チャレンジのPegaインスタンスに、以下のログイン情報を入力します。
- User nameフィールドに「author@gogoroad」と入力します。
- Passwordフィールドに「pega123!」と入力します。
- App Studioのナビゲーションペインで、「Case Types > Assistance Request」をクリックして、Assistance Requestケースタイプにアクセスします。
- Assistance RequestケースライフサイクルのCreateステージで、ステップをクリックし、右のコンテキスチャルプロパティペインでをクリックします。
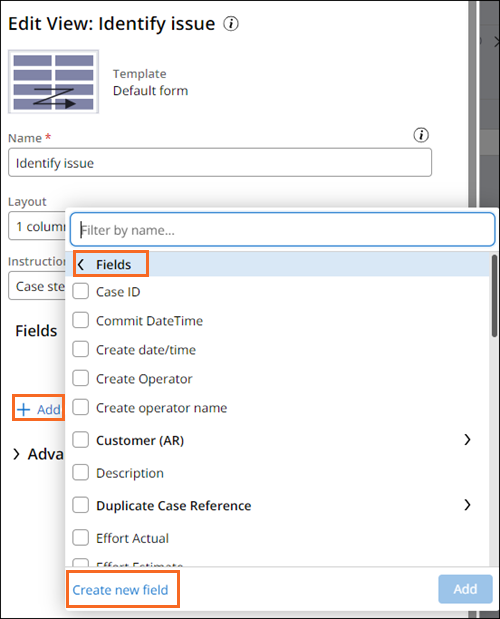
- Edit View: Identify issueウィンドウのFieldsセクションで、をクリックします。
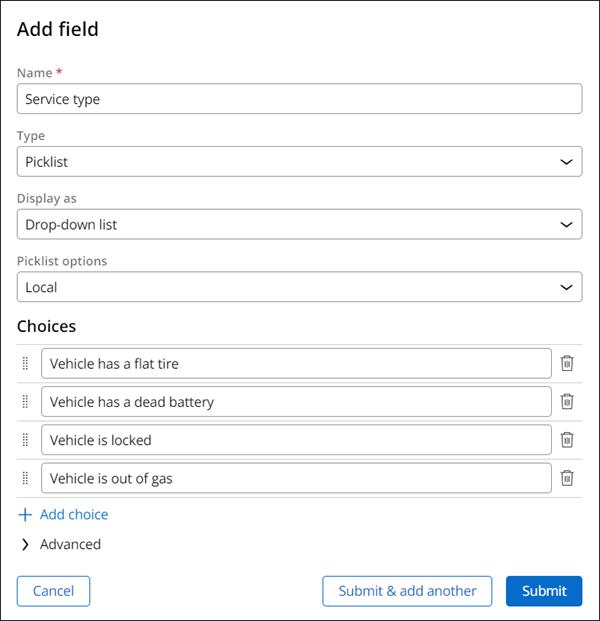
- Add fieldダイアログボックスのNameフィールドに、「Service type」と入力します。
- Typeフィールドで、システムがデフォルトでPicklistになっていることを確認します。
- Service typePicklistの最初の選択肢に、「Vehicle has a flat tire」と入力します。
- をクリックします。
- 手順7~8を繰り返して、残りの選択肢を追加します。
- Vehicle has a dead battery
- Vehicle is locked
- Vehicle is out of gas
- をクリックします。
- ウィンドウで、Service typeフィールドの右側にあるConfigure アイコンをクリックします。
- ウィンドウのConditionsセクションのRequiredフィールドで、を選択します。
- をクリックしてダイアログボックスを閉じます。
- をクリックしてIdentify issueビューを保存します。

2 Identify customerビューを設定する
- Assistance Requestケースライフサイクルで、 ステップをクリックし、右のコンテキスチャルプロパティペインでをクリックします。
- ウィンドウのFieldsセクションで、をクリックします。
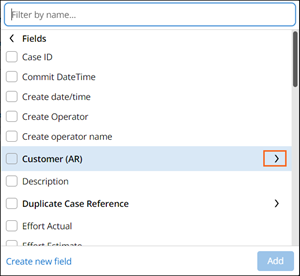
- Fields リストで、「Customer (AR)」を選択し、を選択します。

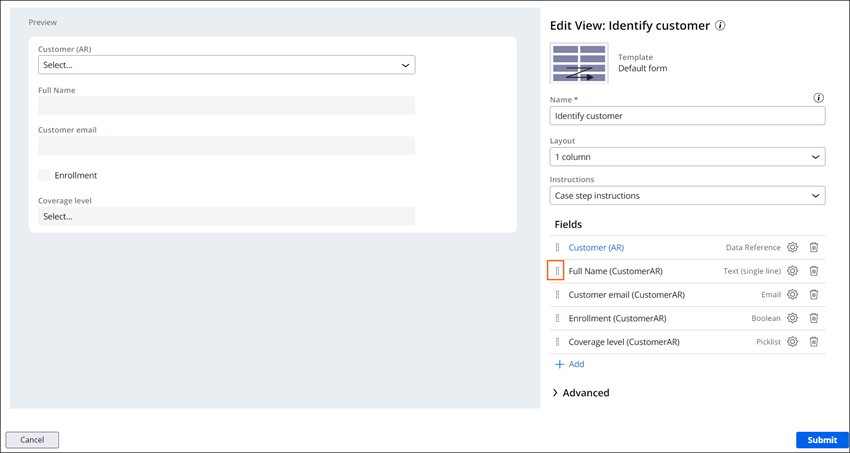
- ウィンドウのFieldsセクションで、「Customer (AR)」をクリックします。
- ダイアログボックスで、以下を入力します。
- Modeフィールドが「Single-select」であることを確認します。
- Display as, フィールドで、「Dropdown」を選択します。
- Data pageフィールドが「List Customer」であることを確認します。
- Display fieldフィールドが「Account ID」であることを確認します。
- をクリックして、ウィンドウを閉じます。

- ウィンドウで、「Add > Fields」をクリックします。
- ダイアログボックスで、Customer (AR)フィールドを展開します。
- ダイアログボックスで、「Fields」をクリックします。
- 利用可能なCustomer (AR)フィールドのリストで「Coverage level」、「Customer email」、「Enrollment」、および「Full name」をクリックし、「Add」をクリックします。
- Coverage levelフィールドの右側のConfigureアイコンをクリックします。
- ダイアログボックスのEdit modeフィールドで、Read-onlyを選択してをクリックします。
- 手順11~12を繰り返して、Customer email、Enrollment、およびFull nameフィールドを読み取り専用に設定します。
- Drag handle を使用して、読み取り専用フィールドを、Full name、Customer email、Enrollment、およびCoverage levelとして並べ替えます。
- Customer (AR) フィールドの右側のアイコンをクリックします。
- ダイアログボックスのField label fieldで、「Custom」を選択します。
- Custom field labelフィールドに、「Customer」と入力します。
- セクションのRequiredフィールドで、 を選択します。
- をクリックします。

- をクリックしてIdentify customerビューを保存します。

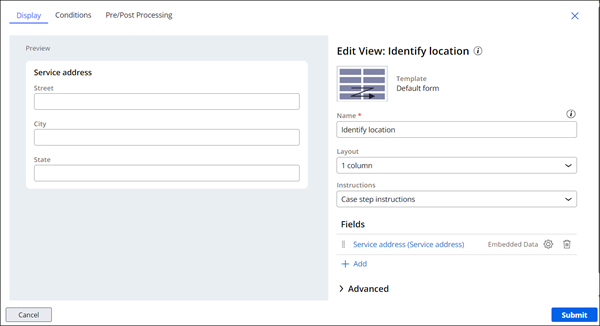
3 Identify locationビューを設定する
- Assistance Requestケースライフサイクルで、Identify location ステップをクリックし、右のコンテキスチャルプロパティペインでをクリックします。
- ウィンドウのFieldsセクションで、をクリックします。
- フィールドのリストで、「Service address (AR)」を選択し、「」をクリックします。
- ウィンドウの「Service address (AR) (Service address) 」をクリックします。
- ウィンドウのセクションで、アイコンをクリックしてPrimary fieldsビューを削除します。
- セクションで、「Add > Fields」をクリックします。
- フィールドのリストで「City」、「State, 」、および「Street」をクリックし、をクリックします。
- Drag handleを使用して、フィールドを、Street、City、Stateとして並べ替えます。

- をクリックしてウィンドウに戻ります。
- Service address (AR) (Service address)フィールドの右側のアイコンをクリックします。
- Field labelフィールドを更新し、「Service address」と入力します。
- をクリックします。
- をクリックしてIdentify locationビューを保存します。
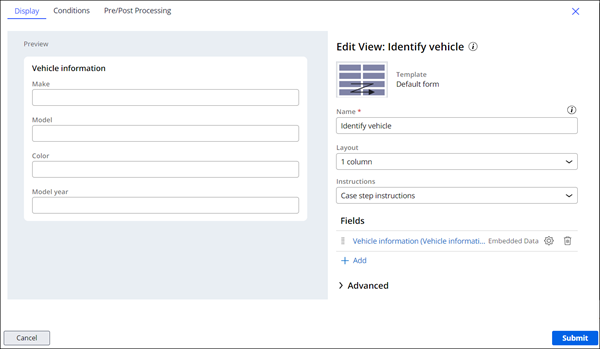
4 Identify vehicleビューを設定する
- Assistance Requestケースライフサイクルで、Identify vehicle ステップをクリックし、右のコンテキスチャルプロパティペインでをクリックします。
- ウィンドウのFieldsセクションで、をクリックします。
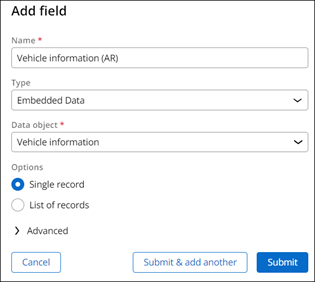
- Add fieldウィンドウのNameフィールドに、 「Vehicle information (AR)」と入力します。
- Typeフィールドで、「Embedded Data」を選択します。
- Data objectフィールドで、「Vehicle information」を選択します。
- Optionsフィールドで、「Single Record」を選択します。
- をクリックして、Vehicle information (AR)データリレーションシップを作成します。
- ウィンドウの「Vehicle information (AR) (Vehicle information)」をクリックします。
- Fieldsセクションで、アイコンをクリックしてPrimary fieldsビューを削除し、「Add > Fields」をクリックします。
- フィールドのリストで「Color」、「Make, Model」、および「Model year」を選択し、をクリックします。
- ModelフィールドとModel yearフィールドの間のColorフィールドをドラッグします。

- 「Back」をクリックしてウィンドウに戻ります。
- Vehicle information (AR) (Vehicle information)フィールドの右側のアイコンをクリックします。
- Field labelを「Vehicle information」に更新します。
- をクリックします。
- をクリックしてIdentify vehicleビューを保存します。
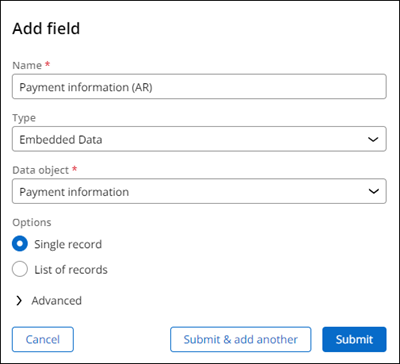
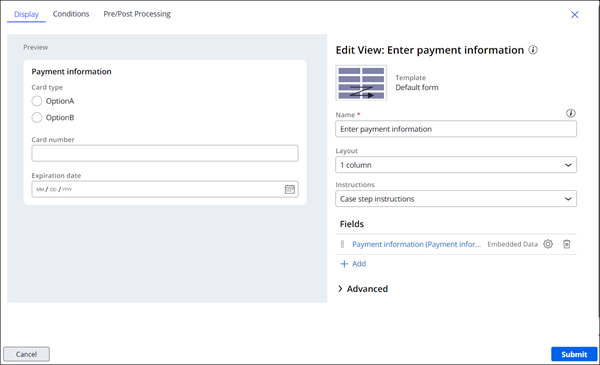
5 Enter payment informationビューを設定する
- Assistance Requestケースライフサイクルで、Enter payment information ステップをクリックし、右のコンテキスチャルプロパティペインでをクリックします。
- ウィンドウのFieldsセクションで、をクリックします。
- Add fieldダイアログボックスのNameに、「Payment information (AR)」と入力します。
- Typeフィールドで、「Embedded Data」を選択します。
- Data objectフィールドで、Payment informationを選択します。
- Optionsフィールドで、「Single Record」を選択します。
- をクリックして、Payment information (AR)データリレーションシップを作成します。
- ウィンドウの「Payment information (AR) (Payment information)」をクリックします。
- Fieldsセクションで、アイコンをクリックしてPrimary fieldsビューを削除し、「Add > Fields」をクリックします。
- フィールドのリストで「Expiration date」、「」、および「」を選択し、「Add」をクリックします。
- Drag handleを使用して、フィールドを、Card type、Card number、Expiration dateとして並べ替えます。

- をクリックして
- Payment information (AR) (Payment information)フィールドの右側のアイコンをクリックします。
- ダイアログボックスで、Field labelを「Payment information」に更新します。
- をクリックします。
- をクリックして、Enter payment informationビューを保存します。
6 Select services performedビューを設定する
- Assistance Requestケースライフサイクルで、Select services performed ステップをクリックし、右のコンテキスチャルプロパティペインでをクリックします。
- ウィンドウのFieldsセクションで、をクリックします。
- フィールドのリストで「Selected services (AR)」を選択し、「」をクリックします。
- ウィンドウで、「Selected services (AR).」をクリックします。
- ウィンドウのDisplay as フィールドで、「Repeating View」を選択します。
- Record view フィールドで、「Selected service view」を選択します。

- 「Back」をクリックしてウィンドウに戻ります。
- Selected Services (AR)フィールドの右側のアイコンをクリックします。
- Custom field labelフィールドに、「Selected service」と入力します。
- をクリックします。
- ウィンドウで、「Add > Fields > Total of services > Add」をクリックします。
- Total of servicesフィールドの右側のConfigureアイコンをクリックします。
- Edit modeフィールドで「Read-only」を選択し、をクリックします。
- をクリックしてSelect services performedビューを保存します。

- をクリックして、作業を保存します。
このチャレンジは、下記のモジュールで学習したことを実践するための内容です。
このモジュールは、下記のミッションにも含まれています。
トレーニングを実施中に問題が発生した場合は、Pega Academy Support FAQsをご確認ください。