Creating a child Case for BAs
8 Tasks
30 mins
Beginner
Case Management
Constellation
English
Scenario
The Microjourney® for a GoGoRoad customer includes initiating the request for service, receiving the service, and for certain membership status, receiving an invoice for services rendered.
In a recent DCO session, stakeholders agreed with your analysis that the customer Microjourney can use two distinct Case Types configured in a parent/child relationship:
- The Assistance Request Case Type is the parent and models the request initiation and customer invoicing
- The Service Case Type is the child and models the service-related workflow.
The creation of the Service Case Type occurs during the Assistance Request Case Type's Service Stage. The Service Case Type includes functionality to perform and document the selected services. After the resolution of the Service Case, the Assistance Request Case Type can resume.
Another Business Architect on the GoGoRoad project has already configured the Service Case Type within the GoGoRoad application. Your current task is to configure the Create case Step that creates the Service child Case and the Wait Step that defines the Case dependency criteria under which the Assistance Request Case Type resumes. Configuration of both of these Steps takes place in the Assistance Request Case Type.
User Stories
As a GoGoRoad CSR, I want an Assistance Request Case to automatically create a Service Case when the business process enters the Service Stage and automatically resume when the Service Case is resolved so that the customer journey is managed efficiently.
As a GoGoRoad Service Coordinator, I want the the Assistance Request Case to transfer data related to the customer, service address, service type, and vehicle information so that I have the information I need to dispatch the service provider.
Technical notes documented by the System Architect
- The Assistance Request Case Type includes a Process called Create Service Case that includes a Create Case automation Step and a Wait Automation Step.
- In the Assistance Request Case, the Create Case automation step initiates a Service Case, and transfers data for the Customer (AR), Service address (AR), Service type, and Vehicle information (AR) field types to the Service Case.
- In the Assistance Request Case, the Wait automation step recognizes that the Service Case must be resolved before proceeding.
- In the Create Stage of the Service Case, the data transferred in the Customer (AR), Service address (AR), Service type, and Vehicle information (AR) fields is displayed in the Assistance Request Info section of the Confirm Assistance Request Step.
The following table provides the credentials you need to complete the challenge:
| Role | User name | Password |
|---|---|---|
| Business Architect | author@gogoroad | pega123! |
Challenge Walkthrough
Detailed Tasks
1 Configure the Service Case Process
- In the Pega instance for the challenge, enter the following credentials:
- In the User name field, enter author@gogoroad.
- In the Password field, enter pega123!.
- In the navigation pane of App Studio, click Case Types > Assistance Request to open the Assistance Request Case Type.
- In the Assistance Request Case Life Cycle, hover over the Service Stage, and then click More > Add Process > New Process.

- In the Process field, enter Create Service Case.
- In the Create Service Case Process, click Step to add a new Step to the Process.
- Click More > Automations > Create Case > Select to add the Create Case Step to the Process.

- In the Step field, enter Create Service Case.
2 Configure the Service child Case
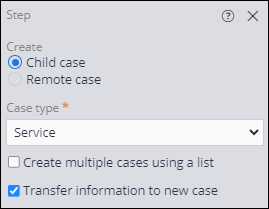
- In the Create Service Case contextual properties pane on the right, confirm that Child Case is the active selection.
- In the Case Type list, select Service to create a Service case, and then click to remove the instructional message.
- Select the Transfer information to new Case checkbox.
- In the Transfer information dialog box, in the 'From' field, select the following checkboxes:
- Customer (AR)
- Service address (AR),
- Service type
- Vehicle information (AR)
- Confirm that the Add mapped fields to the Assistance Request Info view (in 'Service' case type) checkbox is active.
- Click to close the Transfer information dialog box.
- Click Save to save the Assistance Request Case Life Cycle.
3 Delete Steps in the Service Stage
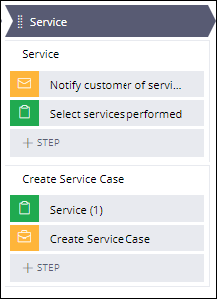
- In the Create Service Case Process, on the Service (1) Step, click the icon.
- In the Service Process, on the Select services performed Step, click the icon.
This Step is no longer needed as it is now part of the Service child Case.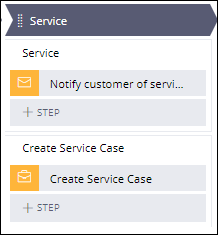
4 Remove the Persona and data object
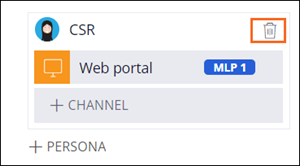
- In the Service Stage, in the Personas & Channels section, in the CSR Persona, click the icon.
- The CSR Persona is no longer needed for the Service Stage as the process is now performed in the Service child Case.
- In the Service Stage, in the Data & Interfaces section, in the Selected service data object, click the icon.
The Selected service data object is no longer needed for the Service Stage as the process is now performed in the Service child Case.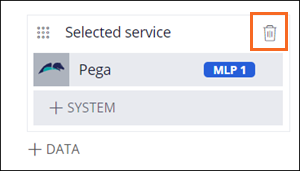
5 Add a Wait Step to the Create Service Case Process
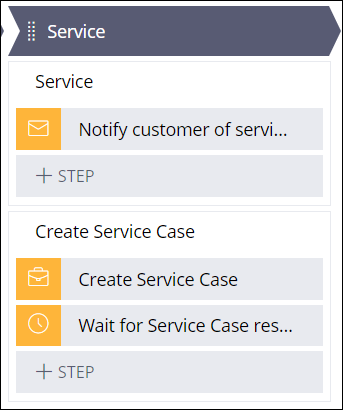
- In the Service Stage, in the Create Service Case Process, click Step > More > Automations > Wait > Select to add a Wait Step that pauses Assistance Request Case processing while the Service Case is active.
- In the Wait Step field, enter Wait for Service Case resolution.
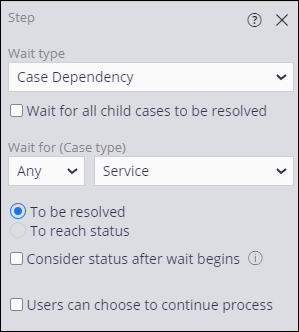
- In the contextual properties pane on the right, in the Wait for (Case type) list, select Service to set a dependency on the Service Case.
Note: In this challenge, the Assistance Request case type creates a single Service child case, and there is no difference between the Any and All options.
- Select To be resolved to pause the Assistance Request Case until the Service Case is resolved.
- Clear the Users can choose to continue process checkbox.
- In the upper-right corner, click Save to save the changes to the Assistance Request Case Life Cycle.
6 Configure the Service Case Type availability
- In the navigation pane of App Studio, click Case Types > Service to open the Service Case Type.
- Click the Settings tab to open the Service Case Type properties.
- Optional: If active, in the General section, in the Availability field, clear the Make available for adding to create menu checkbox.
This action prevents users from manually creating a Service Case in the Create menu of the Web Portal.
- Click Save to save the Service Case Type.
Note: To reflect the Service Case Type settings, log out and then log back in to the application.
7 Configure the Confirm Assistance Request Info Step
- In the Service Case Type menu, click the tab.
- In the Create Stage, click the Confirm Assistance Request information Step.
- In the contextual properties pane on the right, click .
- In the Fields section, click the icon to delete the Primary fields View.
- In the Fields section, click Add > Views > Assistance Request Info > Add to add the information transferred from the Assistance Request Case Type.
- In the Fields section, click Assistance Request Info.
- Drag the Service type field above the Search for Customer (AR) Customer field.
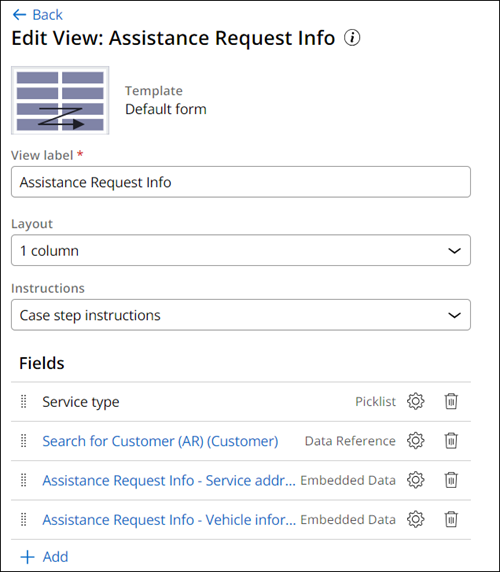
- Click to close the View.
- Click to save your work.
8 Configure the Send service summary Email Step
- In the Service Case Type, click the Send service summary Step to display the contextual properties pane on the right.
- In the contextual properties pane, in the Send to list, select Field.
- In the second Send to list, select Customer (AR) > Customer email.
- In the Subject field, enter "Your service is complete!"
- In the Message content section, click Compose.
- In the rich text editor, enter the following text to compose the email message:
Dear <<.CustomerAR.FullName>>,
Your service is now complete. The total of services rendered for case <<.pyID>> was <<.TotalOfSelectedServices>>.
You will be billed directly from GoGoRoad.
Best regards,
The Services Team
- Click Done to complete the message composition and display a message preview.
- Click Save to apply the changes.
This Challenge is to practice what you learned in the following Module:
Available in the following mission:
If you are having problems with your training, please review the Pega Academy Support FAQs.
Want to help us improve this content?