Case-Genehmigungen mit einer Zuständigkeitsmatrix konfigurieren
2 Aufgaben
10 Min.
Mittel
Case Management
Deutsch
Szenario
GoGoRoad-Stakeholder möchten Gebietsleitern gestatten, mit zunehmendem Servicewachstum neue Lieferanten als Dienstanbieter hinzuzufügen. Handelt es sich bei dem neuen Service-Provider um den Automobil-Club TAA, mit dem GoGoRoad bereits zusammenarbeitet, wird der Case „NewVendor“ zur Genehmigung an den Vorgesetzten des Gebietsleiters weitergeleitet. Anschließend wird der Case an einen Compliance-Beauftragten weitergeleitet, der sicherstellt, dass die Anfrage mit dem Vertrag zwischen dem TAA und GoGoRoad in Einklang steht. Handelt es sich um einen anderen Service-Provider als den TAA, wird der Case „New Vendor“ zunächst an den Vorgesetzten und dann an die Geschäftsleitung zur Genehmigung weitergeleitet. Erstellen Sie eine Entscheidungstabelle, um die korrekte Weiterleitung der Genehmigung sicherzustellen. Fügen Sie dem Case-Typ „New Vendor“ einen Approval-Step hinzu, um das beschriebene Verhalten zu erreichen.
In der folgenden Tabelle finden Sie die Anmeldedaten, die Sie zur Durchführung der Challenge benötigen.
| Rolle | Benutzer ID | Kennwort |
|---|---|---|
| Application Developer | author@gogoroad | pega123! |
Challenge-Schritte
Genaue Übungsschritte
1 Configure the Approve vendor step
- In the navigation pane of Dev Studio, click Case types > New vendor to open the New vendor case type.
- In the Approval process, click Step > Approve/Reject.
- Name the step Approve vendor.
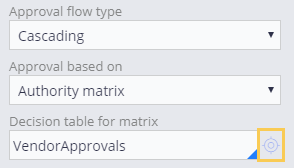
- With the Approve vendor step selected, from the General tab of the properties pane, in the Approval flow type drop-down, select Cascading.
- In the Approval based on drop-down, select Authority matrix.
- In the Decision table for matrix field, enter VendorApprovals as the decision table that determines the conditions for populating the page list.
- To the right of the Decision table for matrix field, click the Open icon.
- On the Create Decision Table form, click Create and open.
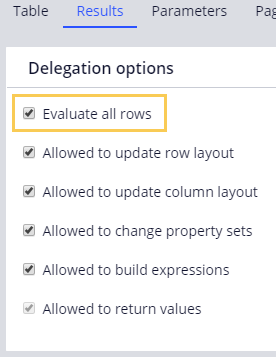
- Click the Results tab.
- In the Delegation options section, select the Evaluate all rows check box.
- Click the Table tab.
- Click the first heading cell to specify the condition property as .NewVendor.Name.
- In the Label field, enter Vendor name.
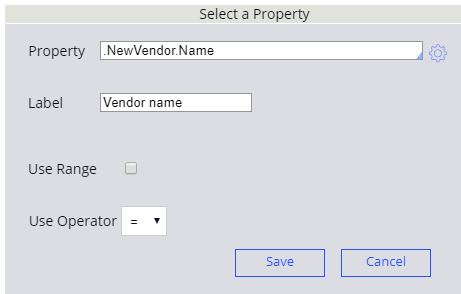
- Keep the default operator as =.
- Click Save to finish configuring the condition.
- Under Actions, click the cell heading to specify the condition property as .GoGoRoadVendorApprovals(<APPEND>).ApproverID.
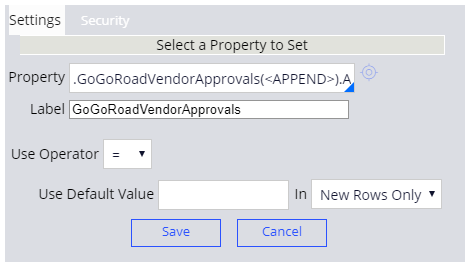
- Keep the default operator as =.
- Click Save to finish configuring the condition.
- Click the Insert Row after icon to insert two additional rows.
- Click each cell in the decision table, and then enter the following values:
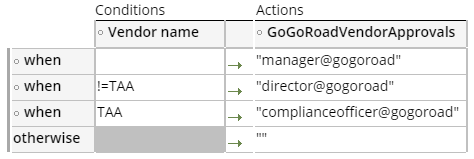
- Click Save to save the decision table.
- Return to the New Vendor case type.
- On the right, in the properties pane, in the Page list property field, enter .GoGoRoadVendorApprovals as the page list property to hold the list of approvers.
- In the Approver property field, enter .ApproverID as an element of the page list to identify each approver in the list.
2 Confirm your work
- In the New vendor case type, click Save and run to create a case instance.
- In the Collect vendor information step, in the Name field, enter TAA.
- Click Submit.
- In the upper right, click Actions > Approval to display the first approval.
- In the Approval view, verify that the open assignment is assigned to the Manager.
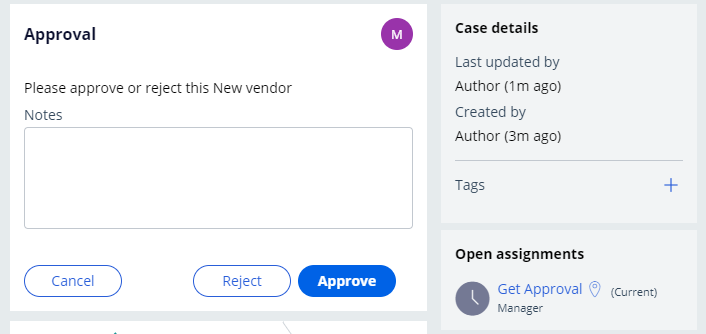
- Click Approve.
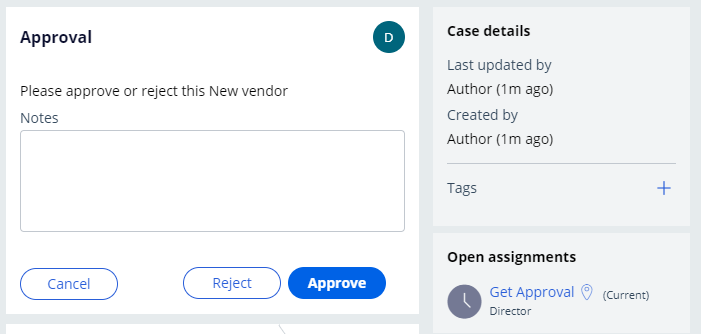
- From the Actions menu, click Approval to display the second approval.
- In the Approval view, verify that the open assignment is assigned to the Compliance Officer.

- Create a New vendor case instance.
- In the Collect vendor information step, in the Name field, enter Pega Towing.
- Click Submit.
- From the Actions Menu, click Approval to display the first approval.
- In the Approval view, verify that the open assignment is assigned to the Manager.
- Click Approve.
- From the Actions menu, click Approval to display the second approval.
- In the Approval view, verify that the open assignment is assigned to the Director.
In der folgenden Mission verfügbar:
Wenn Probleme mit den Lerninhalten auftreten, lesen Sie bitte die Pega Academy Support FAQs.
Möchten Sie uns dabei helfen, diesen Inhalt zu verbessern?