Configuring cascading approvals with an authority matrix
Archived
2 Tasks
10 mins
Intermediate
Case Management
English
Scenario
GoGoRoad stakeholders want to allow Territory Managers to add new vendors as service providers as the service grows. If the vendor is The Automobile Association (TAA), which has an existing relationship with GoGoRoad, the New Vendor case is routed to the Manager of the Territory Manager for approval. The case is then routed to a Compliance Officer, who ensures the request adheres to the agreement between TAA and GoGoRoad. If the vendor is not TAA, the New Vendor case is routed to the Manager, and then the Director for approval. Create a decision table to ensure the approval is routed appropriately. Add an Approval step to the New Vendor case type to support the described behavior.
The following table provides the credentials you need to complete the challenge.
| Role | Operator ID | Password |
|---|---|---|
| Application Developer | author@gogoroad | pega123! |
Challenge Walkthrough
Detailed Tasks
1 Configure the Approve vendor step
- In the navigation pane of Dev Studio, click Case types > New vendor to open the New vendor case type.
- In the Approval process, click Step > Approve/Reject.
- Name the step Approve vendor.
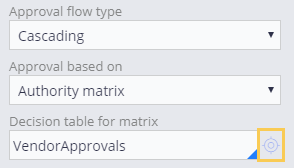
- With the Approve vendor step selected, from the General tab of the properties pane, in the Approval flow type drop-down, select Cascading.
- In the Approval based on drop-down, select Authority matrix.
- In the Decision table for matrix field, enter VendorApprovals as the decision table that determines the conditions for populating the page list.
- To the right of the Decision table for matrix field, click the Open icon.
- On the Create Decision Table form, click Create and open.
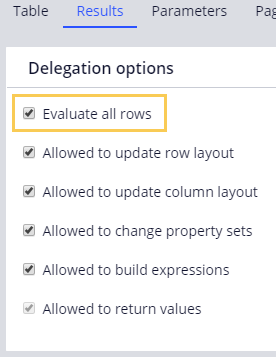
- Click the Results tab.
- In the Delegation options section, select the Evaluate all rows check box.
- Click the Table tab.
- Click the first heading cell to specify the condition property as .NewVendor.Name.
- In the Label field, enter Vendor name.
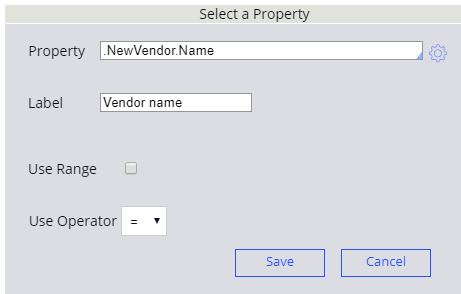
- Keep the default operator as =.
- Click Save to finish configuring the condition.
- Under Actions, click the cell heading to specify the condition property as .GoGoRoadVendorApprovals(<APPEND>).ApproverID.
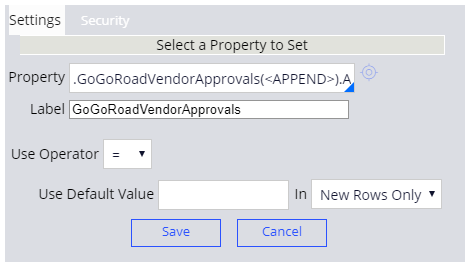
- Keep the default operator as =.
- Click Save to finish configuring the condition.
- Click the Insert Row after icon to insert two additional rows.
- Click each cell in the decision table, and then enter the following values:
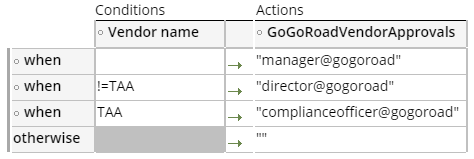
- Click Save to save the decision table.
- Return to the New Vendor case type.
- On the right, in the properties pane, in the Page list property field, enter .GoGoRoadVendorApprovals as the page list property to hold the list of approvers.
- In the Approver property field, enter .ApproverID as an element of the page list to identify each approver in the list.
2 Confirm your work
- In the New vendor case type, click Save and run to create a case instance.
- In the Collect vendor information step, in the Name field, enter TAA.
- Click Submit.
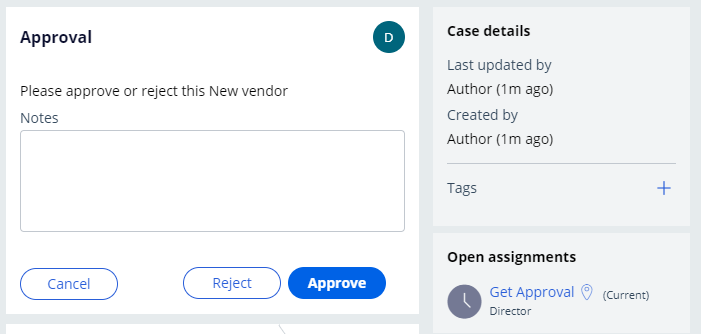
- In the upper right, click Actions > Approval to display the first approval.
- In the Approval view, verify that the open assignment is assigned to the Manager.
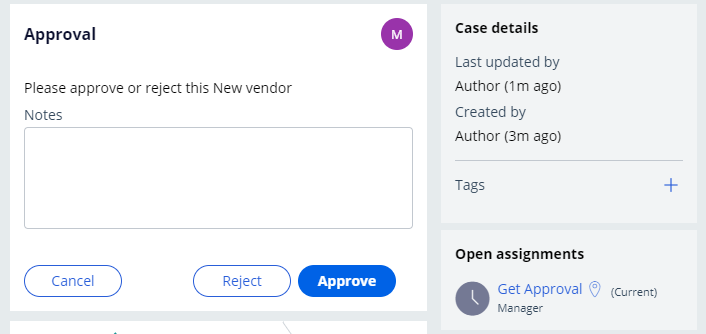
- Click Approve.
- From the Actions menu, click Approval to display the second approval.
- In the Approval view, verify that the open assignment is assigned to the Compliance Officer.

- Create a New vendor case instance.
- In the Collect vendor information step, in the Name field, enter Pega Towing.
- Click Submit.
- From the Actions Menu, click Approval to display the first approval.
- In the Approval view, verify that the open assignment is assigned to the Manager.
- Click Approve.
- From the Actions menu, click Approval to display the second approval.
- In the Approval view, verify that the open assignment is assigned to the Director.