
レポート構造を使用したカスケード承認の設定
3 タスク
10 分
初級
ケースマネジメント
日本語
シナリオ
GoGoRoadの関係者は、サービスの拡大に応じて、地域マネージャーが新規ベンダーをサービスプロバイダとして追加できるようにする必要があります。 ベンダーが自動車協会(TAA)である場合、Add Vendorケースは承認のために地域マネージャーの上司にルーティングされます。TAAはGoGoRoadとすでに関係があります。 ベンダーがTAA以外の場合、Add Vendorケースタイプは、2番目の承認のために取締役にルーティングされます。 記載されている動作をサポートするために、Add VendorケースタイプにApprovalステップを追加します。
以下の表は、チャレンジに必要なログイン情報をまとめたものです。
| ロール | ユーザー名 | パスワード |
|---|---|---|
| システムアーキテクト | author@gogoroad | pega123! |
チャレンジ ウォークスルー
詳細なタスク
1 Create the when conditions
- From the navigation pane of Dev Studio, click App.
- Right-click NewVendor, and then click Create > Decision > When.
- In the Label field, enter Vendor is TAA.
- Click Create and open to create the when rule.
- In the Select drop-down, select Name in the New vendor data object.
- In the second drop-down, keep the default value of is equal to.
- In the third drop-down, enter TAA.
- Click Save to save the when rule.
- To the right of Save, click the down arrow.

- Click Save as to save a copy of the Vendor is TAA when rule.
- In the Label field, enter Vendor is not TAA.
- Click Create and open to create the when rule.
- In the second drop-down list, select is not equal to.

- Click Save to save the when rule.
2 Configure the Approve Vendor step
- In the navigation pane, click Case types > New vendor to open the New vendor case type.
- In the Approval process, click Step > Approve/Reject.
- Name the step Approve vendor.
- With the Approve vendor step selected, from the General tab of the properties pane, in the Approval flow type drop-down, select Cascading.
- In the Approval based on drop-down, keep the default value of Reporting structure.
- In the Approval to be completed by drop-down, keep the default value of Reporting manager.

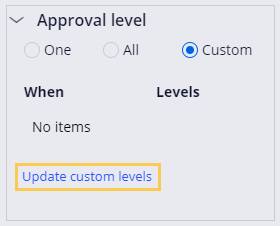
- Expand the Approval level section.
- In the Approval level section, select Custom.
- Click Update custom levels to update the custom approval levels. A dialog box is displayed.
- In the dialog box, click Add custom approval to add a when rule.
- In the When field, enter or select VendorIsTAA.
- In the Levels of approval field, enter 1.
- Click Add custom approval to add a when rule.
- In the When field, enter or select VendorIsNotTAA.
- In the Levels of approval field, enter 2.
- Click Submit to close the dialog.

- Click Save to save the New vendor case type.
3 Confirm your work
- Click Save and run to create a New vendor case instance.
- In the Collect vendor information step, in the Name field, enter TAA.
- Click Submit.
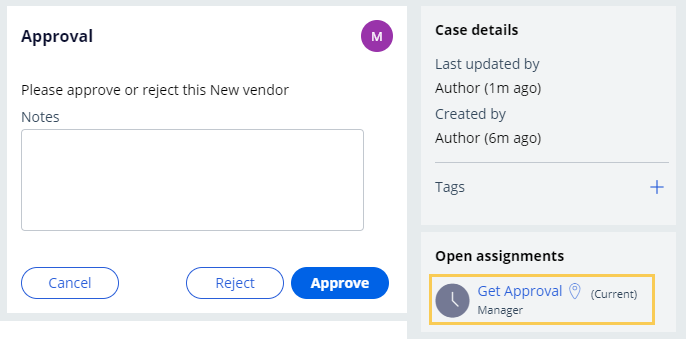
- From the Actions menu, click Approval to display the first approval.
- In the Approval view, verify that the open assignment is assigned to the Manager.
- Click Approve to resolve the case.
- Create a New vendor case instance.
- In the Collect vendor information step, in the Name field, enter Pega Towing.
- Click Submit.
- From the Actions menu, click Approval to display the first approval.
- In the Approval view, verify that the open assignment is assigned to the Manager.
- Click Approve.
- From the Actions menu, click Approval to display the second approval.
- In the Approval view, verify that the open assignment is assigned to the Director.

このモジュールは、下記のミッションにも含まれています。
トレーニングを実施中に問題が発生した場合は、Pega Academy Support FAQsをご確認ください。