Case-Status festlegen
2 Aufgaben
20 Min.
Anfänger
Case Management
Deutsch
Szenario
Nach einer Überprüfung der Fortschritte bei der Entwicklung des Case „Service Request“ sehen der Bürgermeister von MyTown und die Koordinationsstelle für kommunale Dienstleistungen weitere Bereiche mit Verbesserungspotenzial.
Der Bürgermeister und die Koordinationsstelle möchten zu Beginn der Steps „Schedule repair“ und „Perform repair“ Anweisungen hinzufügen und den Case-Status anzeigen. Außerdem soll in der Stage „Resolution“ der Case mit dem Status Resolved-Completed abgeschlossen werden.
Der Bürgermeister und die Koordinationsstelle stellen die folgende Tabelle zur Verfügung, in der die gewünschten Case-Status und Anweisungen aufgeführt sind.
| Step oder Stage | Status | Anweisung |
|---|---|---|
| Step „Schedule repair“ | Öffnen | Assign a due date for the issue |
| Step „Perform repair“ | Pending-Fulfillment | Perform and document the repair |
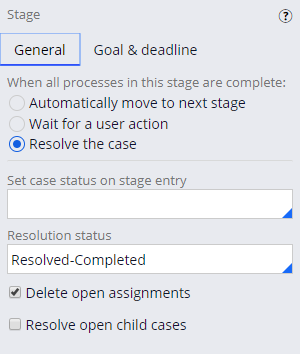
| Stage „Resolution“ | Resolved-Completed | (none) |
In der folgenden Tabelle finden Sie die Anmeldedaten, die Sie zur Durchführung der Challenge benötigen.
| Rolle | Benutzername | Kennwort |
|---|---|---|
| Application Developer | author@mytown | pega123! |
Challenge-Schritte
Genaue Übungsschritte
1 Case-Status festlegen und Anweisungen zu Steps hinzufügen
- Klicken Sie im Navigationspanel von App Studio auf Case types > Service Request, um den Case-Life-Cycle der Serviceanfrage anzuzeigen.
- Klicken Sie im Case-Life-Cycle der Serviceanfrage auf die Stage Resolution, um den Case-Status rechts im Eigenschaftenpanel festzulegen.
- Stellen Sie sicher, dass im Feld Resolution status die Option Resolved-Completed ausgewählt ist.
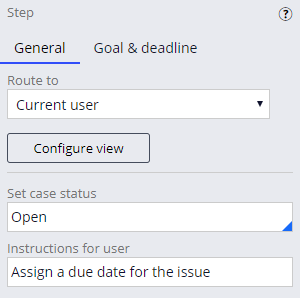
- Klicken Sie in der Stage „Review“ des Case-Life-Cycle auf den Step Schedule repair, um den Case-Status festzulegen und Anweisungen rechts im Eigenschaftenpanel hinzuzufügen.
- Geben Sie im Tab General des Eigenschaftenpanels im Feld Set case status Open ein, um den Case-Status festzulegen, sobald der Case den Step „Schedule repair“ erreicht.
- Geben Sie Assign a due date for the issue im Feld Instruction for user ein.
Hinweis: Wenn Sie eine Anweisung eingeben, beenden Sie die Anweisung nicht mit einem Punkt. Das Hinzufügen eines Punktes zum Anweisungstext führt zu einem Fehler bei der Case-Verarbeitung. Um einen Fehler zu vermeiden, fügen Sie am Anfang und am Ende einer Anweisung, die einen Punkt enthält, doppelte Anführungszeichen (") hinzu.
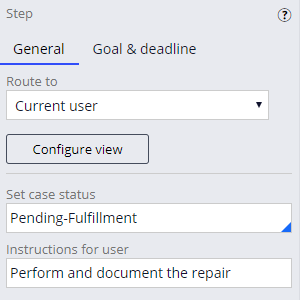
- Klicken Sie in der Stage „Resolution“ des Case-Life-Cycle auf den Step Perform repair, um rechts im Eigenschaftenpanel den Case-Status festzulegen und Anweisungen hinzuzufügen.
-
Geben Sie im Tab General des Eigenschaftenpanels im Feld Set case status Pending-Fulfillment ein, um den Case-Status festzulegen, wenn der Case den Step „Perform repair“ erreicht.
-
Geben Sie im Feld Instructions for user Perform and document the repair ein.
-
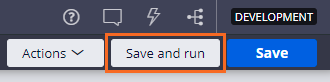
Klicken Sie auf , um die Konfiguration der Case-Status-Einstellungen im Case-Life-Cycle abzuschließen.
2 Arbeit überprüfen (Abschnitt nicht bewertet)
- Aktivieren Sie im App Studio im Tab Settings des Case-Typs „Service Request“ die Checkbox Skip 'Create' view when users create a new case.
- Klicken Sie oben rechts auf Save and run, um eine neue Instanz des Case-Typs aufzurufen. Das System zeigt einen neuen Case „Service Request“.
- Vergewissern Sie sich in dem neuen Case „Service Request“, dass das System den Step „Report problem“ anzeigt. Klicken Sie auf No, advance the case, um den Case fortzusetzen und mit dem Step „Identify location“ weiterzumachen.
 Hinweis: Das System fordert Sie auf, eine Ansicht für den Step zu konfigurieren. Das Erstellen einer Ansicht ist für diese Übung nicht vorgesehen.
 - Klicken Sie auf No, advance the case, um den Case fortzusetzen und mit dem Step „Request updates“ weiterzumachen.
- Klicken Sie auf No, advance the case, um den Case fortzusetzen und mit dem Step „Schedule repair“ weiterzumachen.
- Vergewissern Sie sich im Step „Schedule repair“, dass das System die Anweisungen anzeigt. Vergewissern Sie sich, dass der Case-Status oben auf dem Bildschirm als OPEN angezeigt wird.

- Klicken Sie auf No, advance the case, um mit dem nächsten Step fortzufahren.
- Vergewissern Sie sich im Step „Perform repair“, dass das System die Anweisungen anzeigt. Vergewissern Sie sich, dass der Case-Status oben auf dem Bildschirm als PENDING-FULFILLMENT angezeigt wird.
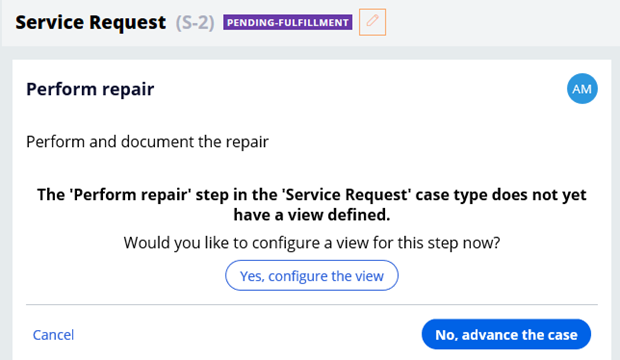
- Klicken Sie auf No, advance the case, um mit dem nächsten Step fortzufahren.
- Überprüfen Sie, ob der Step „Review repair“ als Genehmigungsaufgabe (Approval-Assignment) mit der Aufforderung Please approve or reject this Service Request angezeigt wird.
Hinweis: Approval-Assignments werden mit dieser Eingabeaufforderung automatisch konfiguriert.Hinweis: Es ist nicht notwendig, eine Antwort in das Feld Notes einzugeben, um mit dem Case fortzufahren.
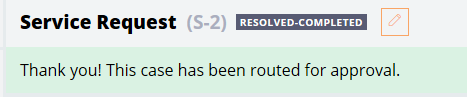
- Klicken Sie auf , um die Reparatur zu genehmigen. Überprüfen Sie, ob der Case-Status als RESOLVED-COMPLETED angezeigt wird.
In der folgenden Mission verfügbar:
Wenn Probleme mit den Lerninhalten auftreten, lesen Sie bitte die Pega Academy Support FAQs.
Möchten Sie uns dabei helfen, diesen Inhalt zu verbessern?