Case-Status festlegen
1 Aufgabe
20 Min.
Anfänger
Case Management
Benutzererfahrung
Constellation
Deutsch
Szenario
Nach einer Überprüfung der Fortschritte bei der Entwicklung des Case „Service Request“ sehen der Bürgermeister von MyTown und der Servicekoordinator für kommunale Dienstleistungen weitere Bereiche mit Verbesserungspotenzial und wünschen folgende Änderungen:
- Die Steps „Schedule repair“ und „Perform repair“ sollten Anweisungen anzeigen und den Case-Status angeben.
- Der Case „Service Request“ wird automatisch abgeschlossen, wenn die Stage „Resolution“ abgeschlossen ist. Die Stage „Resolution“ sollte den Status des abgeschlossenen Case anzeigen.
Der Bürgermeister und der Servicekoordinator stellen die folgende Tabelle zur Verfügung, in der die gewünschten Case-Status und Anweisungen aufgeführt sind.
| Step oder Stage | Status | Anweisung |
|---|---|---|
| Step „Schedule repair“ | Open | Assign a due date for the issue |
| Step „Perform repair“ | Pending-Fulfillment | Perform and document the repair |
| Resolution Stage | Resolved-Completed | (none) |
In der folgenden Tabelle finden Sie die Anmeldedaten, die Sie zur Durchführung der Challenge benötigen.
| Rolle | Benutzername | Passwort |
|---|---|---|
| Application Developer | author@mytown | pega123! |
Hinweis: Ihre Übungsumgebung unterstützt möglicherweise den Abschluss mehrerer Challenges. Es kann daher vorkommen, dass die im Challenge-Walkthrough gezeigte Konfiguration nicht genau mit Ihrer Umgebung übereinstimmt.
Challenge-Schritte
Genaue Übungsschritte
1 Case-Status festlegen und Anweisungen zu Steps hinzufügen
- Geben Sie in der Pega-Instanz für die Challenge die folgenden Anmeldedaten ein:
- Geben Sie in das Feld User name author@mytown ein.
- Geben Sie in das Feld Password pega123! ein.
- Klicken Sie im App Studio Navigationspanel auf Case Types > Service Request.
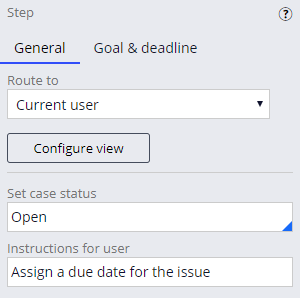
- Klicken Sie auf den Step Schedule repair.
- Geben Sie im Tab General des Eigenschaftenpanels im Feld Set Case Status Open ein oder wählen Sie dies aus, um den Case-Status festzulegen, sobald der Case den Step „Schedule repair“ erreicht.
- Geben Sie im Feld Instructions for user Assign a due date for the issue ein.
Hinweis: Wenn Sie eine Anweisung eingeben, beenden Sie die Anweisung nicht mit einem Punkt. Das Hinzufügen eines Punktes zum Anweisungstext führt zu einem Fehler bei der Case-Verarbeitung. Um einen Fehler zu vermeiden, fügen Sie am Anfang und am Ende einer Anweisung, die einen Punkt enthält, doppelte Anführungszeichen (") hinzu.
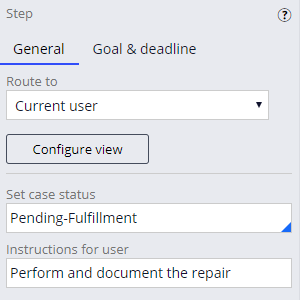
- Klicken Sie auf den Step Perform repair.
- Geben Sie im Tab General des Eigenschaftenpanels im Feld Set case status Pending-Fulfillment ein, um den Case-Status festzulegen, wenn der Case den Step „Perform repair“ erreicht.
- Geben Sie im Feld Instructions for user Perform and document the repair ein.
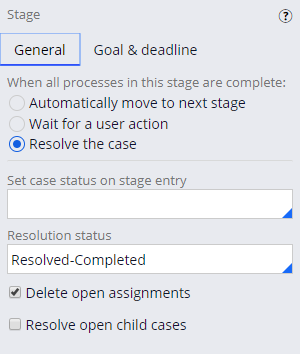
- Klicken Sie auf die Stage Resolution, um den Case-Status rechts im Eigenschaftenpanel zu verifizieren.
- Stellen Sie sicher, dass im Feld Resolution status die Option Resolved-Completed ausgewählt ist.
- Klicken Sie auf , um die Konfiguration der Case-Status-Einstellungen im Case-Life-Cycle abzuschließen.
In dieser Challenge üben Sie, was Sie in den folgenden Modulen gelernt haben:
- Benutzerführung v7
- User guidance v8
In der folgenden Mission verfügbar:
Wenn Probleme mit den Lerninhalten auftreten, lesen Sie bitte die Pega Academy Support FAQs.
Möchten Sie uns dabei helfen, diesen Inhalt zu verbessern?