SLA(サービスレベルアグリーメント)の施行
Archived
1 タスク
10 分
初級
ケースマネジメント
日本語
シナリオ
あなたは、都市サービスのリクエストを受理して管理するアプリケーションMyTown311を開発しています。 「Schedule repair」アサインメントに目標と期限を追加して、サービスリクエストの修理が迅速にスケジュールされるようにします。
以下の表は、チャレンジに必要なログイン情報をまとめたものです。
| ロール | ユーザー名 | Password |
|---|---|---|
| アプリケーションデベロッパー | author@mytown | pega123! |
チャレンジ ウォークスルー
詳細なタスク
1 「Schedule repair」ステップにSLAを設定する
- App Studioナビゲーションペインで、「Case types」>「Service Request」をクリックして、Service Requestのケースライフサイクルを表示します。
- 「Review」ステージで「Schedule repair」ステップをクリックして、右側に構成ペインを表示します。
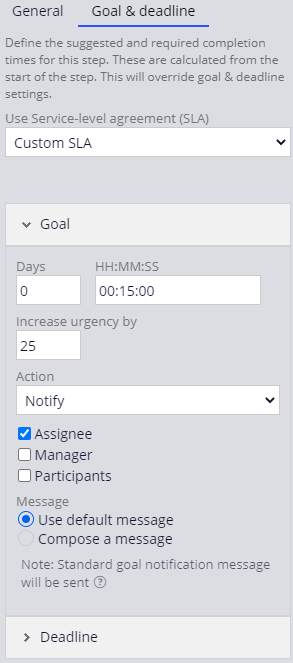
- 構成ペインで「Goal & Deadline」タブをクリックします。
- 「Use Service-level agreement (SLA)」リストから「Custom SLA」を選択して、SLA構成設定を表示します。
- 「Goal」の「Days」フィールドに「0」と入力します。
- 「HH:MM:SS」フィールドに「00:15:00」と入力します。
- 「Increase urgency by」フィールドで、25を入力します。
- 「Action」リストで、「Assignee」チェックボックスをオンにして、アサインメントを受ける人にメッセージを送信します。
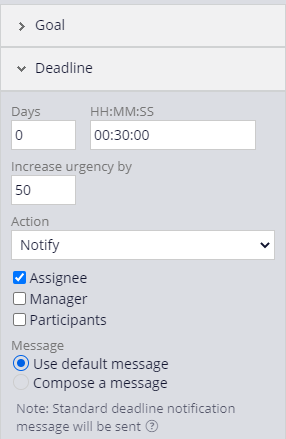
- 「Deadline」をクリックして、期限の設定を開きます。
- 「Deadline」の「Days」フィールドに「0」と入力します。
- 「HH:MM:SS」フィールドに、「00:30:00」と入力します。
- 「Increase urgency by」フィールドで、「50」と入力します。
- 「Action」リストで、「Assignee」チェックボックスをオンにして、アサインメントを受ける人にメッセージを送信します。
- 「」をクリックして、SLAの設定を完了します。