Adding optional Actions to a workflow
1 Task
5 mins
Beginner
Case Management
Constellation
English
Scenario
InsCorp wants to ensure that customers can cancel service requests at any time. To support co-production, a system architect configured the Cancel request Process for a citizen developer to leverage. Add the pre-configured Cancel request Process as a Case-wide optional Action to cancel assistance requests. Update the Process to advance a Case to the Cancellation Stage if the user elects to cancel their assistance request.
Note: The framework of this challenge uses the Constellation architecture of Pega Platform™. To practice this challenge on the Traditional UI architecture, see the Adding optional Actions to a workflow version 8.8 challenge.
The following table provides the credentials you need to complete the challenge.
| Role | User name | Password |
|---|---|---|
| Application Developer | author@gogoroad | pega123! |
Note: Your practice environment may support the completion of multiple challenges. As a result, the configuration shown in the challenge walkthrough may not match your environment exactly.
Challenge Walkthrough
Detailed Tasks
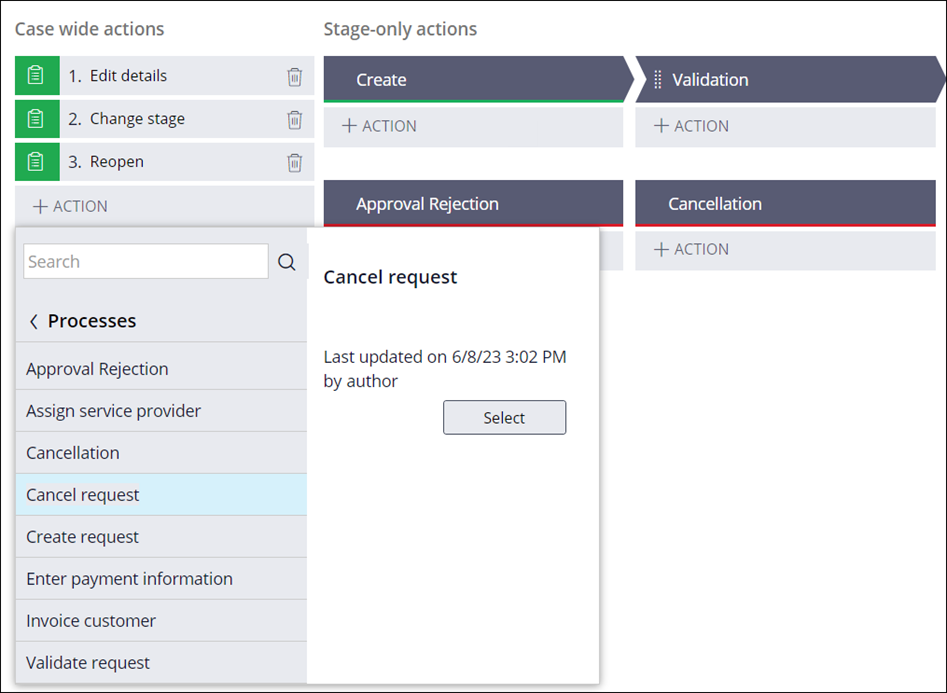
1 Add the Cancel request Process as a Case wide Action
- In the Pega instance for the challenge, enter the following credentials:
- In the User name field, enter author@gogoroad.
- In the Password field, enter pega123!.
- In the navigation pane of App Studio, click Case Types > Assistance Request to open the Assistance Request Case Type.
- In the upper right of the Workflow tab, click Optional Actions to display existing optional Actions.
- In the Case wide Actions section, click Action > More > Processes to display a list of existing Processes.
- From the list of Processes, click Cancel request > Select to display the Process in the list of Case wide Actions.
- In the upper right, click Save to apply changes to the Assistance Request Case Type.
This Challenge is to practice what you learned in the following Module:
Available in the following missions:
If you are having problems with your training, please review the Pega Academy Support FAQs.
Want to help us improve this content?