Setting Case Status
1 Task
20 mins
Beginner
Case Management
Constellation
English
Scenario
Note: The framework of this challenge uses the view-based Constellation architecture of Pega Platform. To practice this challenge on the traditional UI-based architecture Theme Cosmos, see the Setting case status version 8.7 challenge.
After reviewing the progress on the service request case development, the MyTown Mayor and the Services Coordinator see additional areas for improvement and request the following changes:
- The Schedule repair and Perform repair steps should display instructions and specify the case status.
- The Service Request case is resolved automatically when the Resolution stage is complete. The Resolution stage should reflect the resolved case status.
The Mayor and the Services coordinator provide the following table of the desired case statuses and instructions.
| Step or Stage | Status | Instruction |
|---|---|---|
| Schedule repair step | Open | Assign a due date for the issue |
| Perform repair step | Pending-Fulfillment | Perform and document the repair |
| Resolution stage | Resolved-Completed | (none) |
The following table provides the credentials you need to complete the challenge.
| Role | User name | Password |
|---|---|---|
| Application Developer | author@mytown | pega123! |
Note: Your practice environment may support the completion of multiple challenges. As a result, the configuration shown in the challenge walkthrough may not match your environment exactly.
Challenge Walkthrough
Detailed Tasks
1 Configure case status and add instructions to steps
- In the Pega instance for the challenge, enter the following credentials:
- In the User name field, enter author@mytown.
- In the Password field, enter pega123!.
- In the App Studio navigation pane, click Case types > Service Request.
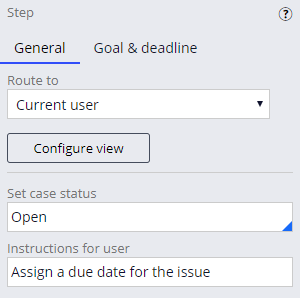
- Click the Schedule repair step.
- In the General tab of the property pane, in the Set case status field, enter or select Open to set the case status when the case enters the Schedule repair step.
- In the Instructions for user field, enter Assign a due date for the issue.
Note: When entering an instruction, do not end the instruction with a period. Adding a period to the instruction text causes an error when processing a case. To avoid an error, add double quotation marks (") to the beginning and end of an instruction that includes a period.
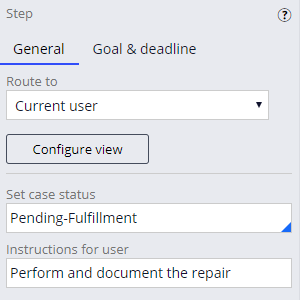
- Click the Perform repair step.
- In the General tab of the property pane, in the Set case status field, enter or select Pending-Fulfillment to set the case status when the case enters the Perform repair step.
- In the Instructions for user field, enter Perform and document the repair.
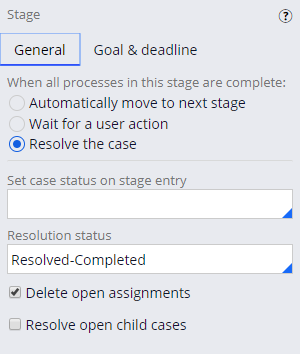
- Click the Resolution stage to verify the case status in the property pane on the right.
- In the Resolution status field, confirm that Resolved-Completed is selected.
- Click to complete the configuration of case status settings in the case life cycle.
This Challenge is to practice what you learned in the following Module:
If you are having problems with your training, please review the Pega Academy Support FAQs.
Want to help us improve this content?