Creating a child Case
2 Tasks
10 mins
Beginner
Case Management
User Experience
Constellation
English
Scenario
InsCorp is launching a roadside assistance service as a coverage option for automobile insurance policies. Configure the Assistance request Case Type to create a Service Case during the Service Stage to perform the selected services.
The following table provides the credentials you need to complete the challenge.
| Role | User name | Password |
|---|---|---|
| Application Developer | author@gogoroad | pega123! |
Note: Your practice environment may support the completion of multiple challenges. As a result, the configuration shown in the challenge walkthrough may not match your environment exactly.
Challenge Walkthrough
Detailed Tasks
1 Create a Service Case as a child Case
- In the Pega instance for the challenge, enter the following credentials:
- In the User name field, enter author@gogoroad.
- In the Password field, enter pega123!.
- In the navigation pane of App Studio, click Case Types > Assistance Request to open the Assistance Request Case Type.
- Hover over the Service Stage, and then click More > Add Process > New Process.

- In the new Process field, enter Create service case.
- Under the Create service case Process, click Step to create a new Step in the Stage.
- Click More > Automations > Create Case, and then click Select to add the Create Case Step to the Process.

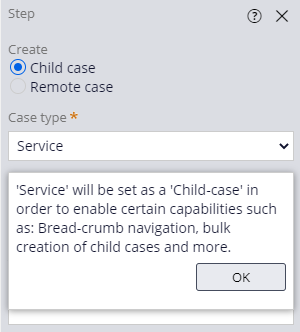
- In the Create Case Step, enter Create service case to replace the default text.
- In the contextual properties pane on the right, in the Case Type list, select Service to create a Service Case, and then click OK.
- Click Transfer information to new Case to display the Transfer information window.
- Select Customer ID, Service address, Vehicle information.
- Ensure that the Add mapped fields to 'Assistance Request Info' view (in 'Service' Case type) check box is selected.
- Click OK to dismiss the Transfer information window.
- On the Service (1) Step, click the delete icon to delete the Step. Ensure that the Service Stage matches the following image:

- Click Save to save the Assistance Request Case Life Cycle.
2 Configure the Service Case Type
- In the navigation pane of App Studio, click Case Types > Service to open the Service Case Type.
- Click Confirm request details, and then in the contextual properties pane on the right click Configure View.
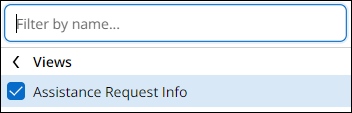
- In the Fields section, click Add > Views to display a list of Views.
- Click Assistance Request Info, and then Add.
- Click Submit to submit the changes to the Confirm request details View.
- Click the Settings tab to open the Service Case Type properties.
- In the General section, under Availability, confirm that the Make available for adding to create menu check box is cleared to disable Service Case creation in the create menu.

- Click Save to save the Service Case Type.
This Challenge is to practice what you learned in the following Module:
Available in the following mission:
If you are having problems with your training, please review the Pega Academy Support FAQs.
Want to help us improve this content?