Sending emails during Case processing
1 Task
15 mins
Beginner
Case Management
Constellation
English
Scenario
Note: The framework of this challenge uses the view-based Constellation architecture of Pega Platform. To practice this challenge on the traditional UI-based architecture Theme Cosmos, see the Sending emails during case processing version 8.7 challenge.
The mayor of MyTown wants users to receive email updates when the reported issue is resolved.
The following table provides the credentials you need to complete the challenge.
| Role | User name | Password |
|---|---|---|
| Application Developer | author@mytown | pega123! |
Note: Your practice environment may support the completion of multiple challenges. As a result, the configuration shown in the challenge walkthrough may not match your environment exactly.
Challenge Walkthrough
Detailed Tasks
1 Configure the Send email step
- In the Pega instance for the challenge, enter the following credentials:
- In the User name field, enter author@mytown.
- In the Password field, enter pega123!.
- In the App Studio navigation pane, click Case types > Service Request to display the case life cycle.
- In the Resolution stage, select the Send repair confirmation step to display the configuration pane on the right.
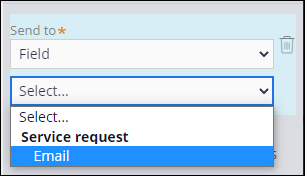
- In the configuration pane, from the first Send to list, select Field.
- From the second Send to list, select Email to set the Send to value.
- In the Subject field, enter "Your service request has been completed!"
Note: To display punctuation in text labels and fields such as the email subject line, enclose the text and punctuation in quotes.
- Under Message content, click Compose to display the Compose message window.

- In the rich text editor, enter the following text to compose the email message:
Hello!
We have addressed the issue <<.pyID>> that you logged on <<.pxCreateDateTime>>. Thank you for using the MyTown 311 app!Office of the Mayor,
MyTown
Tip: You can click the Insert property icon to select a property from a list. Select Case ID for .pyID and Create Date/Time for .pxCreateDateTime. If the Insert property icon is not visible, log out and log back in.
- Click Done to complete the message composition and display a message preview.
- Click Save to complete the step configuration.
Note: The number of configuration issues decreases from 1 to 0 and the configuration issues icon disappears.
This Challenge is to practice what you learned in the following Module:
If you are having problems with your training, please review the Pega Academy Support FAQs.
Want to help us improve this content?